Learn how to speed ramp your video and how to create smooth slow motion by using Time Remapping in Adobe Premiere Pro.
Tutorial Files
Drone Flight.mp4
Walter Kraken.mp4
There are 3 different ways that you can control the speed of your video in Adobe Premiere Pro.
- You can use the Rate Stretch tool
- You can define the playback speed of your clip using the Speed/Duration settings
- You can use Time Remapping
Let’s talk about how to use each of these options.
Using the Rate Stretch Tool
One of the easiest way to speed up or slow down your video is with the Rate Stretch tool. You can find this tool in your toolbar. It might be hidden behind one of the other editing tools so simply click and hold to access it.
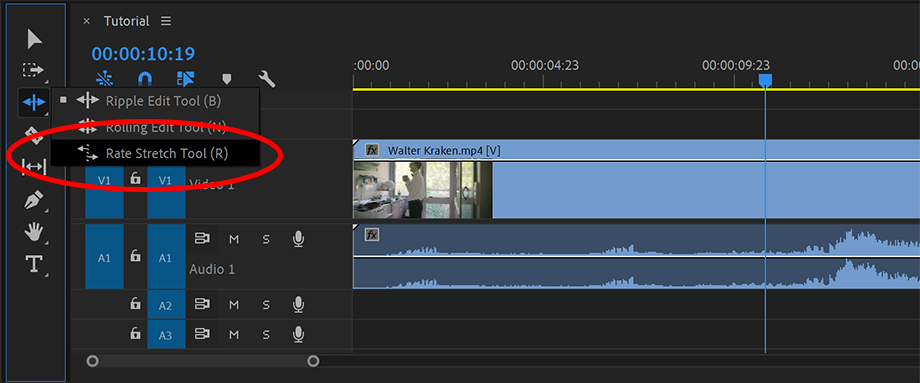
With the Rate Stretch tool selected, simply click on the end of your clip and shorten or extend it to speed up or slow down your video.
Specifying the Playback Speed of your Video Clips
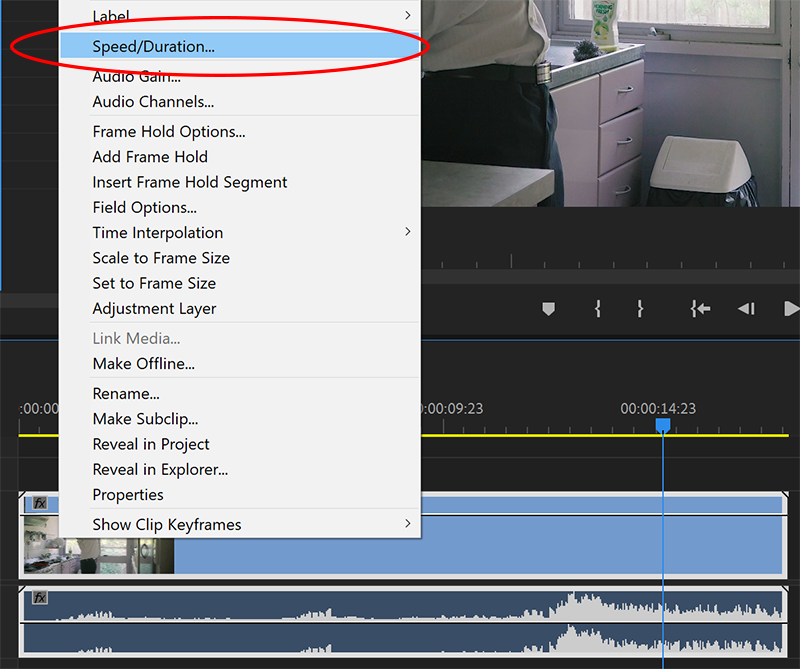
Another option is to right click on your clip in the Editor Timeline and go to the ‘Speed/Duration…’ settings.
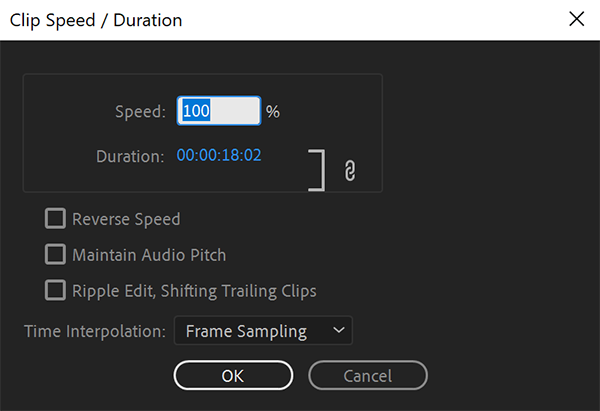
This will open up the Speed and Duration settings for the clip. In her you can specify the percentage speed of your video. You can also Reverse the video, select to Maintain Audio Pitch and Ripple Edit or Shift any clips further in the timeline.
Using Time Remapping
All of the previous options affect the entire clip. If you need more control you can use Time Remapping. With Time Remapping you can create speed ramps where you ramp up or down the speed of your video smoothly.
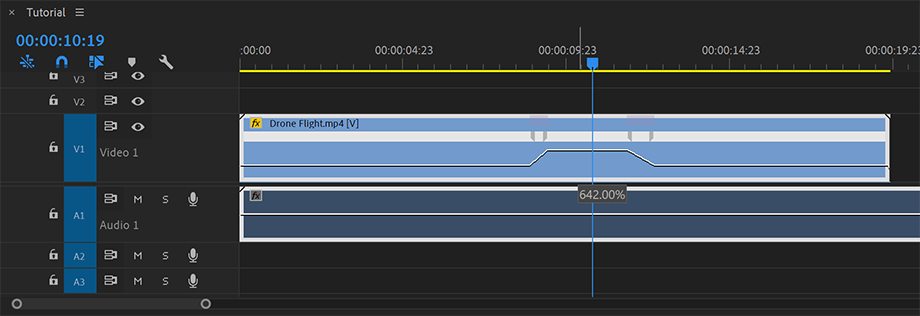
You can enable Time Remapping by right clicking on your clip and going to Show Clip Keyframes -> Time Remapping -> Speed.

This will add a horizontal white line to the clip on your timeline that represents the playback speed. You can drag this line up or down to speed up or slow down the clip.
You can also create keyframes (with CTRL/CMD + click) and animate the speed of the clip. In order to smoothen out the transition you can drag the handles of the keyframes left and right to create interesting speed ramp effects.
Learn Premiere Pro for FREE with my Easy Beginner Course 😊
Time Interpolation & Creating Smooth Slow Motion
When you slow down a video in Adobe Premiere Pro, you stretch out the content. Premiere Pro needs to figure out where to get the additional frames to extend your video duration.
If you want smooth slow motion you need to film your video at a high frame rate. If your clip is filmed at 60 FPS, your sequence is set to 30 FPS and you are playing your clip back at 50% speed, Premiere Pro has enough additional frames in the video to give you perfectly smooth motion.
However, if your video was shot at 30 FPS, Premiere Pro needs to figure out where to get those additional frames from to play back at 50% speed.
This is where Time Interpolation becomes important. Time Interpolation allows you to control how Premiere Pro generates the frames required to let you slow down your video.
You can access this option by right clicking the clip and going into the Speed/Duration settings.
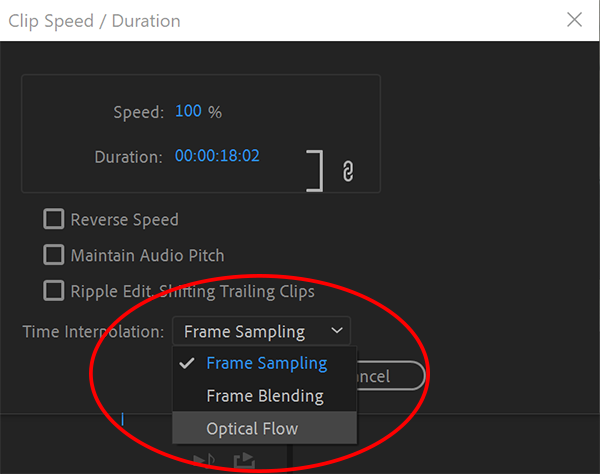
Time Interpolation gives you 3 options.
Frame Sampling
Premiere Pro will source the frame from the video. If there are not enough frames in the video (e.g. not shot at a high enough frame rate), the nearest frame will be used. This can lead to duplicated frames and stuttering video if you slow down your video.
Frame Blending
Premiere Pro will generate a blended frame to fill the extra space. This frame is a mix between consecutive frames in the source video. You will likely see duplicated edges and a motion trail where there is movement.
This can be an interesting effect if you want to convey the feeling of someone being a bit disoriented, drunk or zoned out.
Optical Flow
Optical Flow looks ahead and back to guess the movement of the objects in your scene based on their pixels. Premiere Pro will try to generate frames that fill in the missing movement.
This option will look closest to true slow motion. However you may see little artefacts or glitches and it will likely not be quite as perfect as shooting your video at a high frame rate.
FREE Premiere Pro Beginner Course


2 Responses
Nice tutorial. I have used ramping, but did not realise the effect of the various render options in basic Speed changes. I am in Bega, NSW. My computer is overdue for an update (over 4 years old). Getting a bit slow for renders now I am using more 4k footage. Currently have RAID 0 12TB drives, and NVIDIA Quadro 4200K card with Intel i7-5820K CPU @ 3.30GHz. Any recommendations?
Thanks! In terms of computer, there’s a few pieces that are important: mainly RAM, CPU power and SSDs. Depending on the program CUDA support in your GC is useful too. E.g. NVIDIA Quadro is actually pretty good. While there is no easy answer on what to get and what not to get, I have a video discussing some (hopefully useful) considerations here :) [youtube id=”nvZORXtbRng”]