Advanced Morphing in Adobe After Effects
Setting Up The Morph Effect
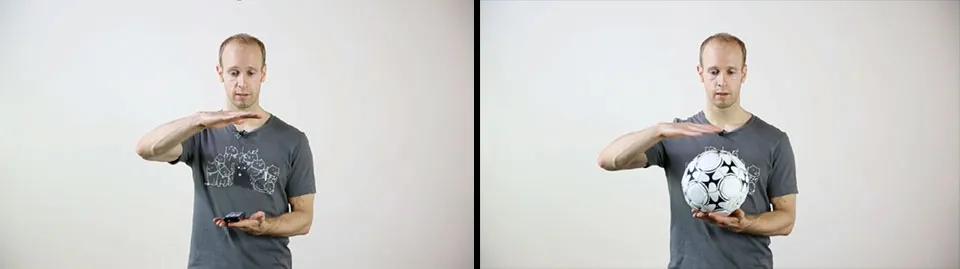
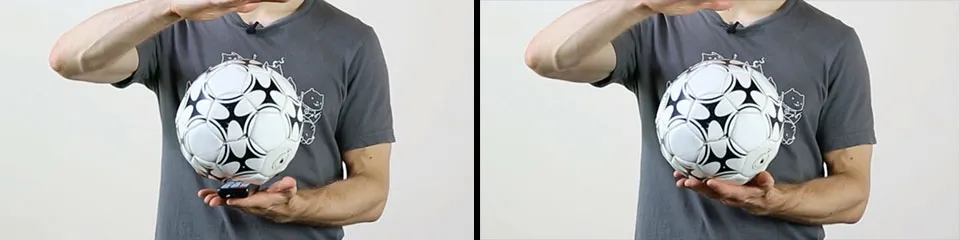
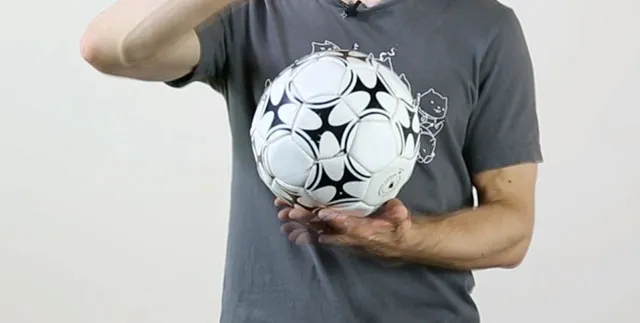
A lot of people have asked me how I created the VFX for the intro of my popular Adobe After Effects morphing tutorial. In the intro sequence I am holding a TV remote and then, moving my right over it, it transforms into a soccer ball directly in my hands!

The trick is actually pretty simple. As I spin my hand over the object I freeze all movement. Celina then comes into the scene and replaces the object in my hand while I try to hold perfectly still. After Celina has left the frame again I continue to move as if nothing had happened.

The last step is to create a smooth transition between the remote and the soccer ball to really sell the morph effect! That is what I will teach you in this tutorial.
Morphing One Object Into Another
First off, import the clip you filmed into After Effects. Create two separate layers, one going up to the moment where your helper is replacing the object and the second one starting after the object has been replaced. I cut out the middle section where Celina pops up and replaces the remote with a soccer ball. Try to align these two clips as best as you can for a seamless transition.

There will be an obvious cut where the remote control suddenly turns into the soccer ball. Also, since I did not manage to hold perfectly still, the position of my hands and arms does change slightly from one clip to the next. We will clean up this transition as part if this tutorial.
The first thing to do however, is to morph the remote control in my hand into the soccer ball. For this, duplicate the Remote layer, rename this copy to ‘Remote Morph’, and trim it down to the duration of the morph effect. Make sure this layer ends exactly when the soccer ball layer becomes visible.

Apply a mask to the remote control in my hand and animate the Mask Path property so the mask follows the movement of the remote. If you don’t know how to do this, go check out my After Effects masking tutorial.
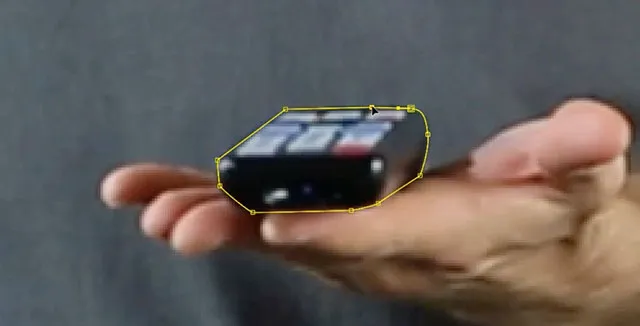
You should end up with a number of keyframes on the Mask Path property and the mask should follow the shape of the remote as precisely as possible. Finally, and this is important, rename the mask to ‘Remote’ so we can easily identify it.

Now repeat the same process for the Soccer Ball layer. First, duplicate the layer and rename the copy to ‘Soccer Ball Morph’. Trim the layer down to start at the same time as the Remote Morph layer and end when the full Soccer ball layer kicks in.

As before, add a mask to the soccer ball in the Soccer Ball Morph layer.
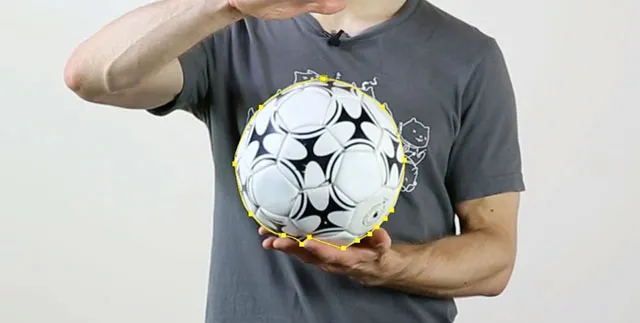
Again, animate the Mask Path property to have the mask follow the shape of the ball as precisely as possible for the duration of the morph effect. Change the name of this mask to ‘Soccer Ball’.

Select the ‘Soccer Ball’ mask and copy and paste it onto the Remote Morph layer. Set the mask mode to ‘None’ so this mask has no effect on the contents of the footage.

Now select the ‘Remote’ mask on the Remote Morph layer and copy and paste it onto the Soccer Ball Morph layer. Set the mask mode to ‘None’ so the mask has no effect on the contents of this layer.

Because each layer contains both masks and because we will use it to control the morph effect, the naming of these masks is very important! Now that we’ve got the basics set up for the morph effect we will use the Reshape effect to transform the remote control into the soccer ball!
Morphing an Object with the Reshape Effect
There are two parts to the morph effect:
- Animate the remote control to reshape into the soccer ball
- Animate the soccer ball take shape from the remote control
We will first concentrate on making the Remote morph into the shape of the soccer ball so disable the visibility of the Soccer Ball Morph layer.
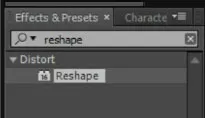
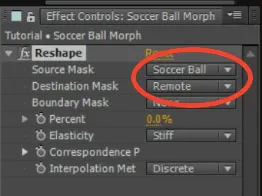
Go to the Effects & Presets panel and search for the ‘Reshape’ effect. This effect allows you to deform the contents of one mask into the contents of another mask on the same layer.
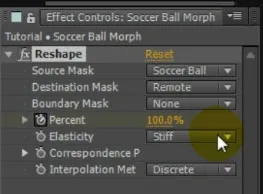
Apply the Reshape effect to the Remote Morph layer. Since we want the remote to transform into the shape of the soccer ball, set the Source Mask property to the ‘Remote’ and the Destination Mask property to the ‘Soccer Ball’ mask.
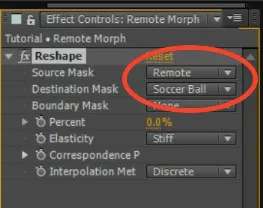
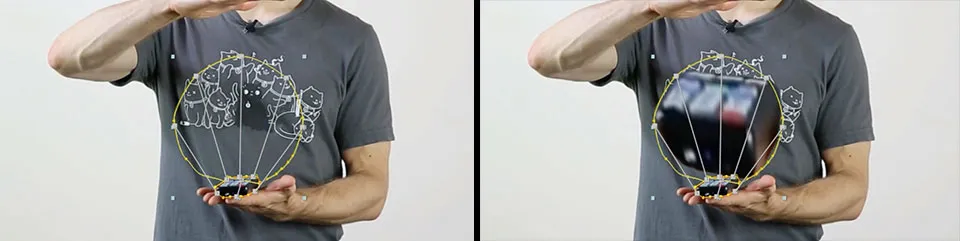
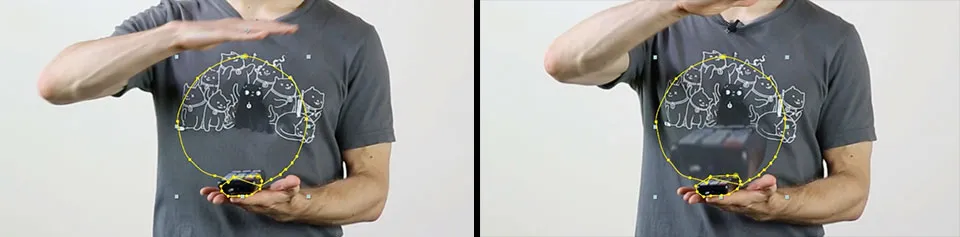
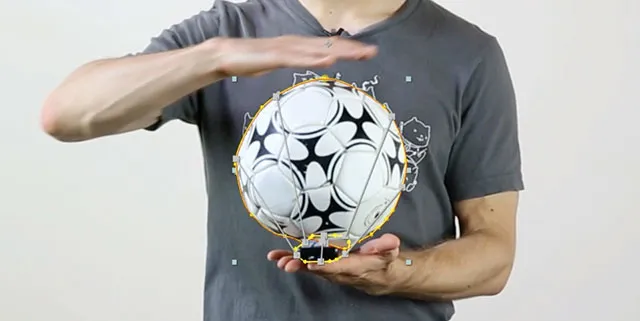
Before we morph the remote into the soccer ball shape we have to tell After Effects how this shape transformation should take place. For this, we have to define the Correspondence Points of the Reshape effect. Correspondence points are represented as lines connecting the source and destination mask and define which part of the source will be deformed into which part of the destination.
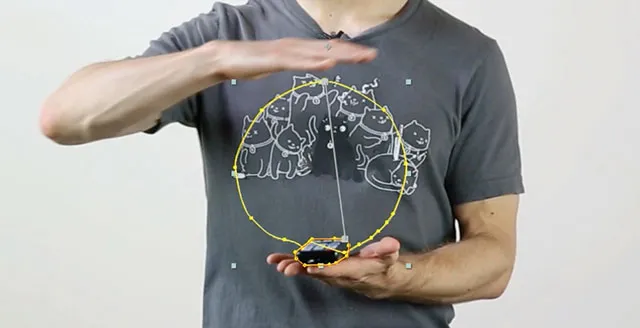
By default the Reshape effect will have only a single correspondence point defined. You can add additional correspondence points by selecting the Reshape effect and ALT-clicking onto the edges of the source or the destination mark. Once added, you can drag the start and end points of the correspondence line around at will. Add enough points to clearly define how the shape of the remote control should be deformed into the soccer ball shape.

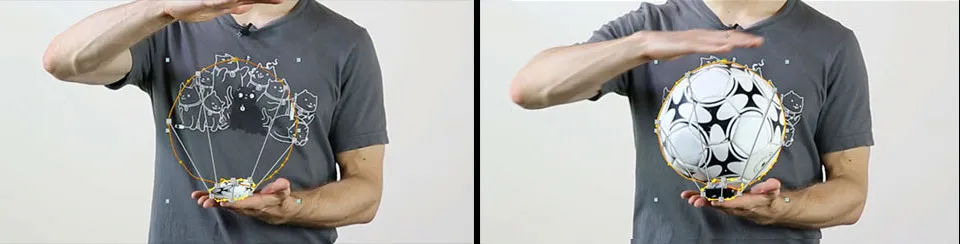
If you now bring up the Percent property of the Reshape effect you should see the remote being deformed into the shape of the soccer ball. Note that you will still see the remote control in my hand from the layer underneath. We will fix that up later. Animate the Percent property from 0 to 100 over the duration of the morph effect.
Also animate the Opacity property of the Remote Morph layer from 100 to 0 during the transition.

This will cause the Remote Morph layer to become invisible as the remote slowly changes shape to the soccer ball.
Now we will repeat this setup in reverse for the soccer ball. Disable the visibility of the Remote Morph layer and re-enable the visibility of the Soccer Ball Morph layer.
We want the soccer ball to fade in as it takes shape from the remote control. Add the Reshape effect to the Soccer Ball Morph layer. This time, select the ‘Soccer Ball’ mask as the source and the ‘Remote’ mask as the destination.
As before, define your correspondence points to make sure the shape change from the remote to the soccer ball looks good. Verify that your setup is correct by adjusting the Percent property on the Reshape effect.
Once you are happy with the setup, animate the Percent property to go from 100 to 0 percent over the course of the morph effect. Note that this is the inverse of what we applied to the Remote Morph layer!
The soccer ball should now start out compressed into the shape of the remote and then morph into its original shape.
Finally, animate the Opacity of the Soccer Ball Morph layer from 0 to 100 during the transition. Again, this is the inverse of how the Opacity behaves for the Remote Morph layer.

If you now enable the visibility of the Remote Morph layer again and play back your transition, you should see the remote morph into the shape of the soccer ball!

There is still a noticeable jump when the transition occurs and you can also still see a copy of the remote lying in my hand. Let’s fix those issues up to smooth out this transition!
Smoothing out the Morph Transition
While the remote control now correctly morphs into the soccer ball, there is still a noticeable jump during the transition because I did not manage to keep my hands in the exact same position.
One simple thing that we can do to make the transition a bit smoother is to fade the final soccer ball layer in rather than cutting straight to it. Extend the Soccer Ball layer to start 2 or 3 frames earlier, before the transition is completed, and then animate the Opacity from 0 to 100% to fade it in.

While this makes the transition look a little smoother, you can clearly see the doubling up of my hands and other body parts that I did not keep perfectly still.
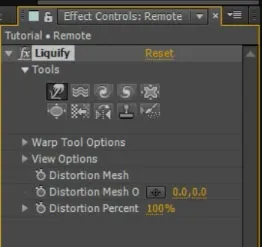
The easiest way to fix this issue is to use the Liquify effect. The Liquify effect allows you to paint specific distortions onto a layer and then apply them gradually. We want to distort the Remote layer to reshape into the Soccer Ball layer in the last instant so we no longer get this ‘doubling up’ of elements.
Select the Liquify effect from your Effects & Presets panel and apply it to the Remote layer. The Liquify effect offers you a number of different brush tools and options that you can use to control the distortion of the layer.
Make sure the Remote layer is selected and then use the brush tool to distort this layer so it aligns with the Soccer Ball layer. If you are on a frame during the actual transition you will notice that you are essentially pushing the ‘doubled up’ body parts on top of each other.

Once the distorted Remote layer matches exactly onto the Soccer Ball layer, animate the Distortion Percentage property of the Liquify effect from 0 to 100 percent just as the transition kicks in. You may have to adjust the keyframes as needed to keep the two layers aligned as best as you can during this transition.

And voila! The effect of morphing an object while holding it in your hands is completed!

You can enhance the morph effect by adding glow and particles to the transition. Check out my How to Make Things Glow Tutorial for some tips on how to do that.
5 Comments
you're right it wasn't that bad. My problem was that I didn't have any footage to use so I was using 2 still images, but they were not the same size. so when I pasted the masks it got very ugly and just would not work.
Hi, I'm having a liquify tool problem that I'm struggling with for a few days.
Let's say that I have a video of a balloon flying in a room. I'm using the liquify effect to change the shape of the balloon on the first frame and a mask to protect distortion of the balloon's surrounding .
The problem is that once the balloon is moving , the liquify plugin ignores the movement of the mask and everything becomes a mess.
I cannot get still images of the balloon.
Any suggestions?
Thanks!
You can use an adjustment layer with the liquify effect applied. Then track the movement of the adjustment layer to follow the balloon so the 'liquify' effect follows the balloon :)
love your tuts, i have been watching all your tuts on you-tube for very long time now, but i have a problem with the reshape effects, it doesn't transform to the destination mask, it becomes squished, am even beginning to think whether its my graphic card, is there any logic behind the reshape and by the thanks, your color correction tut helped me allot
Thank you for the comment! The reshape effect uses the correspondence points you define to determine which parts of the source will map to which parts of the target. If you have concave shapes, this may not always work too well.