Adobe After Effects - Motorcycle Explosion Tutorial
A while ago I created a tutorial on how to use the 3D Camera Tracker in Adobe After Effects.
By accident I happened to have a motorcycle in the shot and I asked if you would like a tutorial on how to blow it up.
I promptly got a ton of requests to show you how to blow up the motorcycle - and here it is :)
How To Blow Up A Motorbike - Adobe After Effects VFX Explosion
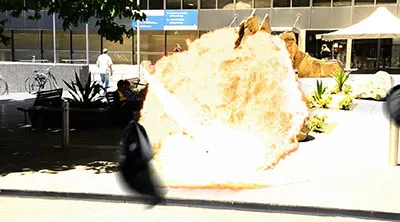
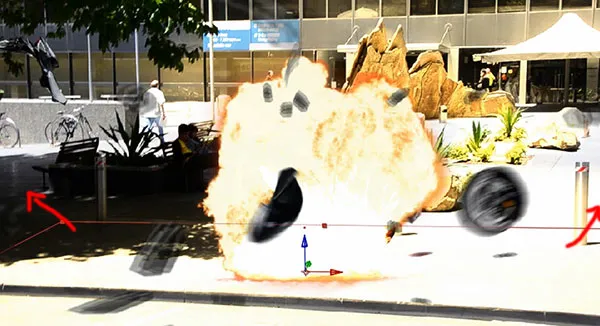
This is the final motorcycle explosion effect we will be creating for this tutorial:

There are a number of steps involved in blowing up any object that you have in a moving camera shot and this tutorial will break the effect down step by step.
Tracking The Footage
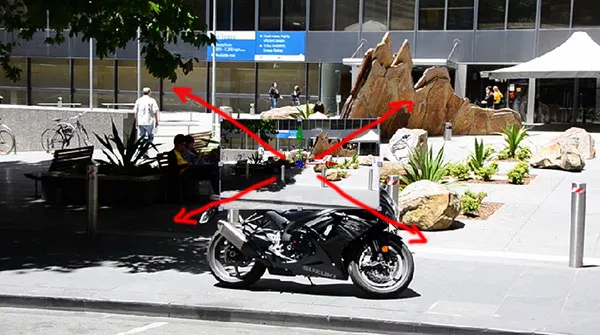
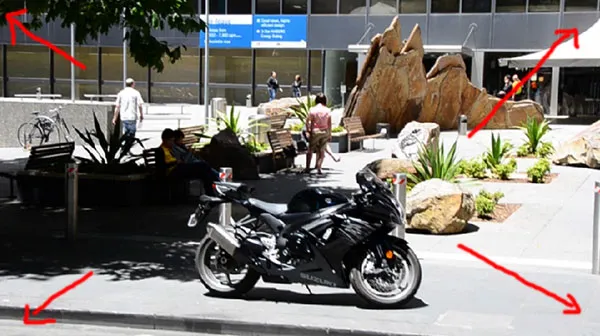
Here is the handheld shot containing the motorcycle in question.
Now I did not film this shot with the intention of adding any visual effects so the footage is not really ideal.
It’s handheld, shaky and I don’t have a clean plate, which is the same shot without the motorcycle in it.

However, you demanded we’ll blow the motorcycle up, so let’s see what we can get out of this piece of footage!
First we need to track our footage. Apply the 3D Camera Tracker effect from the Effects & Presets Panel to the clip.
![]()
Go have a cup of coffee or some juice or whatever floats your boat and come back once the tracker is done doing it’s thing!
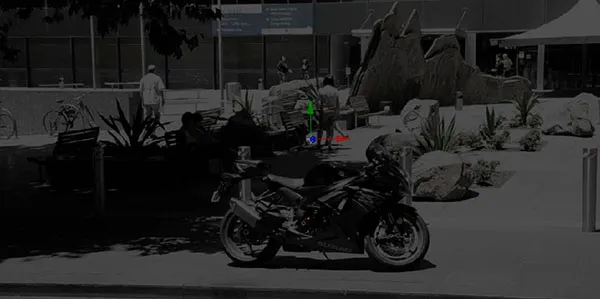
Hopefully all went well and you should now see a large number of 3D track points overlayed onto your footage.
![]()
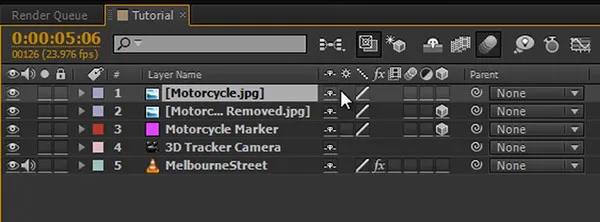
Let’s create a marker in our tracked scene to identify where the motorcycle is in our 3D environment. Select a point on the body of the motorcycle, right click it and create a Null object and a camera.
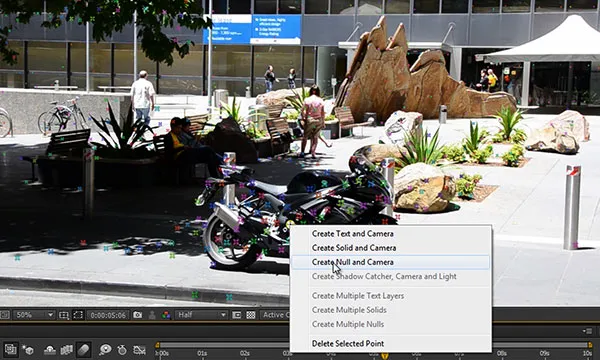
I am going to call the null object ‘Motorcycle Marker’.

Creating a clean plate
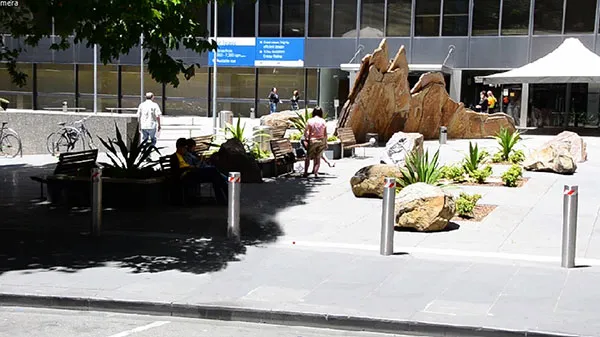
Now, I mentioned I did not have a shot without the motorcycle in it. To get around this issue, I exported a frame with the motorcycle right in the middle from the video and removed the bike manually in Photoshop. Ideally, you’d want to have a photo or a video of the scene without the vehicle you want to blow up, called a clean plate, and you want to capture that clean plate at the same time you’re filming your actual scene. It took a little bit of work, but here is the clean plate I created:
Add the the clean plate into your composition as a new layer.

Trim it down to start exactly when you want the explosion to tear the motorcycle apart.

If we scrub through the footage, the motorcycle disappears, but the moment the clean plate becomes visible, the video seems to freeze. This is expected as the clean plate layer is just covering everything underneath it up.

What we need to do is position the clean plate layer properly in our 3D scene, right in front of the motorcycle.
For this, turn the layer into a 3D layer and reveal the position property on it.
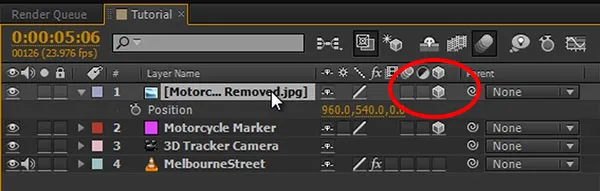
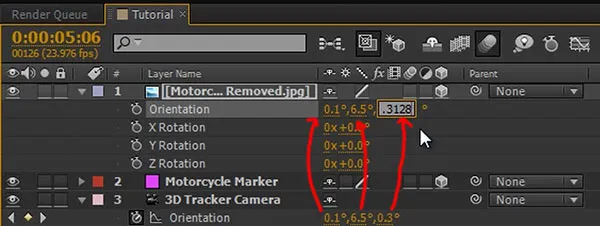
Also reveal the position property on the camera and copy the current position of the camera across to the position of the clean plate. Since the camera is animated, I am doing this manually for the x, y and z coordinate.
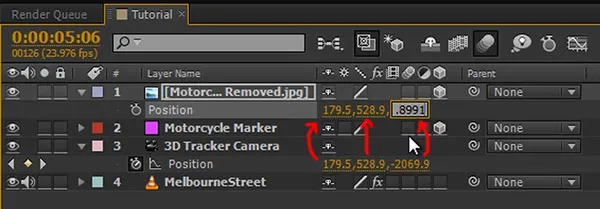
Next, reveal the orientation property on the cover up layer and the camera and copy it from the camera to the cover up layer. Again, I am doing this one value at a time to make sure I’m not screwing anything up.
If you now go to the top view, you should see the clean plate layer and the camera at the exact same position.
Quite a bit in front of the camera, we can see the Motorcycle Marker null object we created. We now want to move our clean plate forward to just before the marker for the motorcycle. This will place the layer in 3D space at the position of the motorcycle.

Return to your active camera view and scale the cover up layer to fit exactly over your composition.
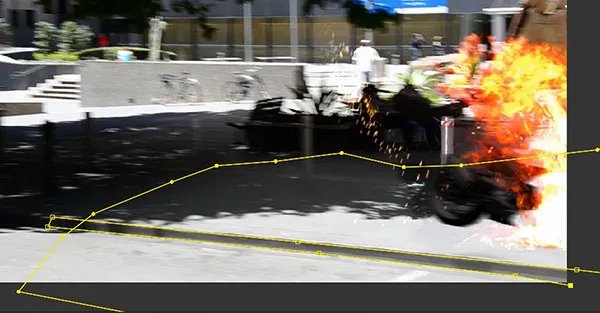
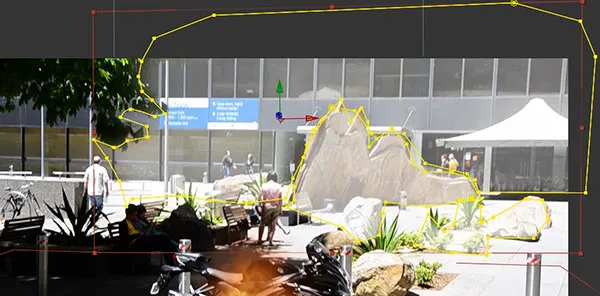
The layer should hide the motorcycle perfectly if you enable/disable it. Lower the opacity of the layer, and then draw a rough mask around the motorcycle. Here is a screenshot of the clean plate overlayed onto the motorcycle.
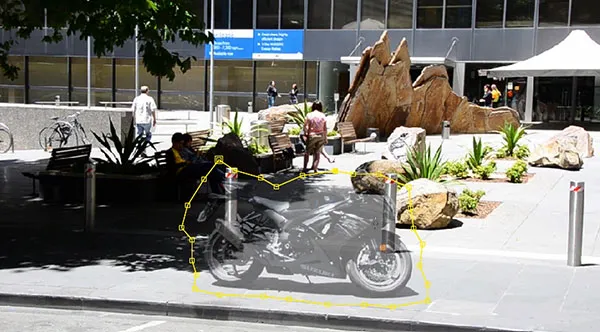
I am going to give the mask some feathering to blend it in a bit nicer. If we bring the opacity back to 100%, the motorcycle should be fully hidden and scrubbing through the footage, the motorcycle should disappear from the moving shot.
Now this is not perfect because the clean plate layer is just a flat layer standing at the same position as the motorcycle and as the camera moves, it starts to mis-align with the background elements, especially the pillars.

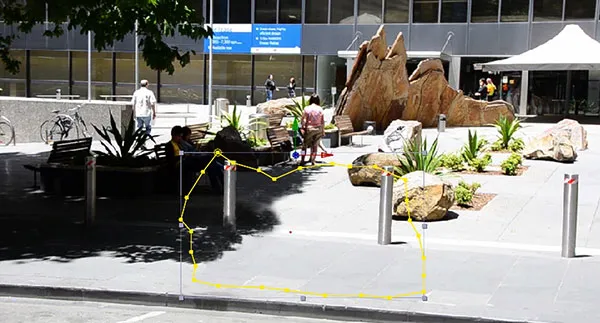
We can fix this up to some degree by animating the position of the clean plate to better match the elements it is covering up.

I am also going to expand the mask a little to ensure the motorcycle remains fully covered. Still not perfect, but for our purposes this should be sufficient.

Let’s start destroying the motorcycle!
Dismembering The Motorcycle
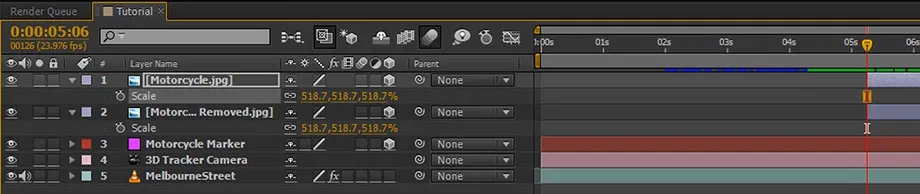
I am going to reuse the single with the motorcycle in it that I used to create my clean plate. Add the image into your composition and trim it to start at the same time as your actual clean plate
Turn it into a 3D layer and copy the position, orientation and scale from the clean plate layer onto this new layer. Do this one by one and ensure all transformation properties are exactly the same so the two layers are placed at the same position in 3D space.

It should now roughly look as if the motorcycle was back in its original spot.

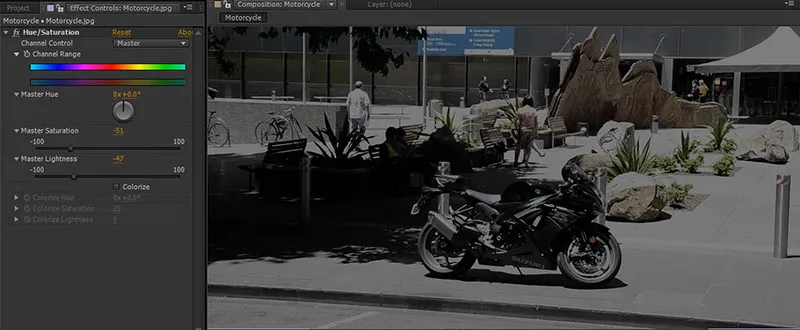
We will duplicate this layer layer in a moment to create the charred remains of our motorcycle, so let’s darken it a bit. For this, apply a hue & saturation effect, de-saturate the layer almost entirely and bring down the master lightness.

Trim down the motorcycle layer to start exactly at the moment the clean plate layer becomes visible.
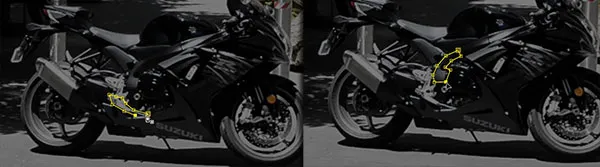
We will now break up the Motorcycle layer that sits on top of our clean plate into chunks of the motorcycle that can then be flung around by the power of the explosion. Let’s call the layer we just added ‘chunk 1’ and use a mask to cut out a big piece of the motorcycle. I will cut out the left half.
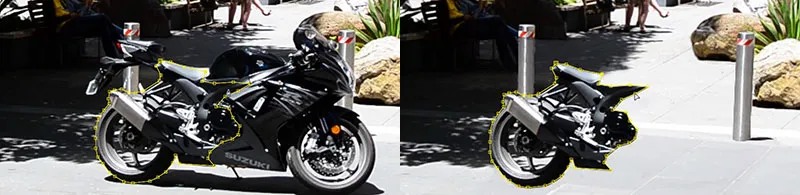
Next, we want to animate this chunk to be thrown around by the explosion. Before you start key-framing the position and rotation, grab the pen behind tool and make sure the anchor sits exactly into the middle of the fragment.
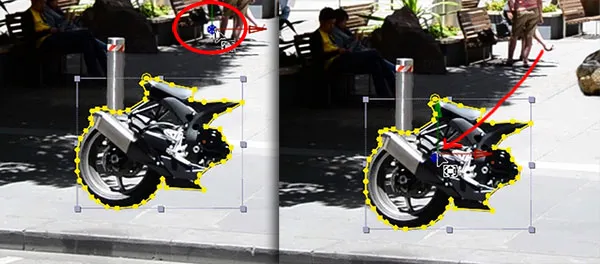
Then animate the position and rotation to make chunk 1 break off the motorcycle as it darkens. Ensure it does not accidentally slip behind the cover up layer (in 3D space) during the animation.

Here is the sequence of the first chunk of the motorcycle being pushed away towards the left side as it chars out.

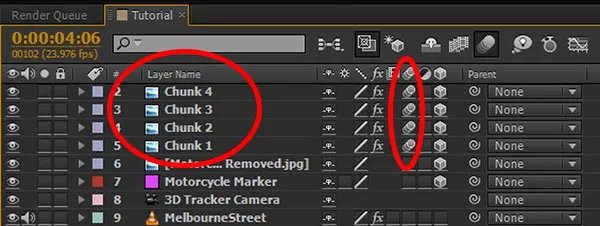
Now duplicate the ‘Chunk 1’ layer and call it ‘Chunk 2’. Delete the mask and create a new mask around a different part of the motorcycle. This time, I will use the right half excluding the wheel, which I will split off separately. Like before, move the anchor to the centre of the chunk and animate it to be pushed to the side by the power of the explosion.
Repeat the same process for the front wheel. Rather than have it drop off slightly, I am going to have the wheel spin wildly and be flung out of the scene on the right to make the explosion appear more energetic. And again, let’s create yet another chunk. This one, the seat, I am going to animate to fly towards and past the camera to give the effect a bit more depth and make it look more dangerous.

Finally, I am also going to create one chunk for the tail and fling it off to the left side, rotating wildly, when the explosion hits. Of course how many chunks you want to create and how you want to animate them is entirely up to you and your personal taste and situation.
One important thing to do to make this look a little more realistic is to enable motion blur on all the bits and pieces of the motorcycle that are animated. You can do this by enabling the motion blur switch on the motorcycle chunk layers as well as on the composition.
Playing back our animation, the motorcycle should break apart and darken nicely just in time for our explosion.

Let’s add that explosion so the motorcycle looks like it’s not just falling apart due to old age!
Adding The Explosion
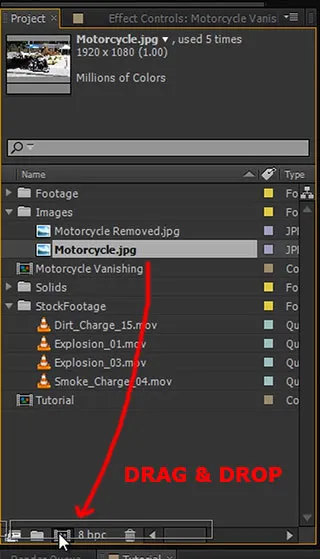
I am going to use stock footage elements from Action Essentials 2 by videocopilot because I think this package is probably the best action stock footage you can find If you don’t want to pay (it’s $99), you can find free stock footage elements at detonationfilms or footagecrate.
Drag your explosion element into your composition to create a new layer.
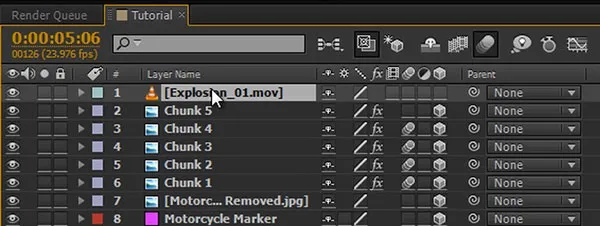
Time the explosion to occur exactly at the moment the bike breaks apart.

Turn the explosion layer into a 3D layer. Using the top view, move it to the position indicated by the Motorcycle Marker null object - just like we did with the clean plate layer.

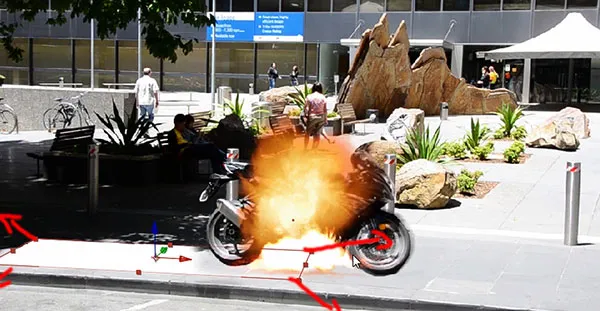
Return to your active camera view and scale up the explosion to fit in nicely with your scene. Position it so it sit just in front of all the chunks we created for the motorcycle.
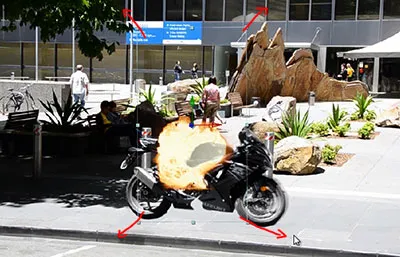
You should now have a nice big explosion on top of your motorcycle breaking apart into separate pieces.

I am actually going to add a second explosion element to make the detonation look more powerful. A simple way to do this is to duplicate the explosion layer we already added, select it, then drag your new stock footage onto it while holding down the ALT key. This will replace the contents of the layer without changing its position in the scene or any of its properties.
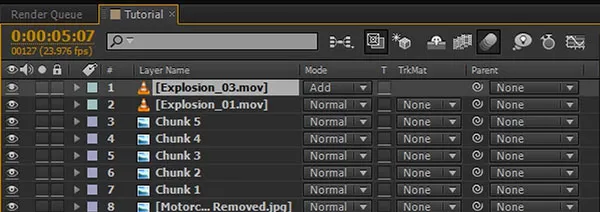
Feel free to position this layer any way you want to sit nicely in your shot. I’ve decided to change the blend mode of this layer to Add to blend it nicely with the layer underneath and give some more intensity to the explosion.

Next, let’s create the light that is being cast by the bike disintegrating in a ball of fire.
What we will do is create some layers to be used as mattes for our lighting.We will create some white matte layers first to define the areas where the final lighting will be visible.
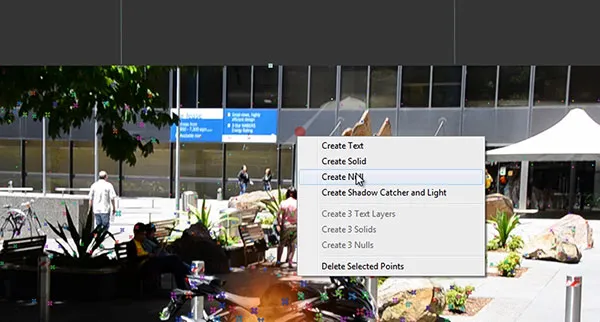
For this, select your tracked footage and the 3D Camera Tracker effect assigned to it to reveal all the 3D track points. Move your cursor over the scene until you see a bulls-eye that matches the ground the motorcycle stands on. Right click and create a new solid.
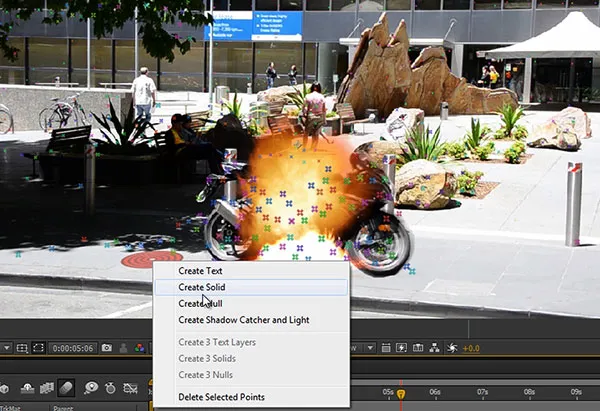
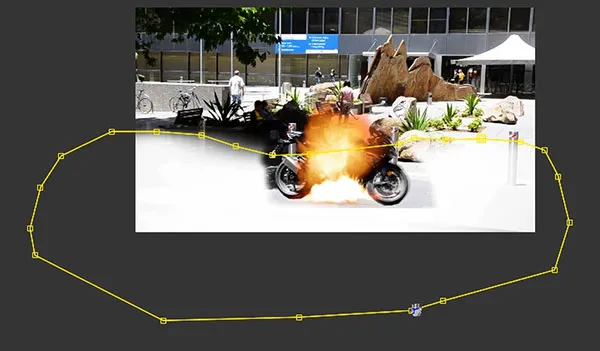
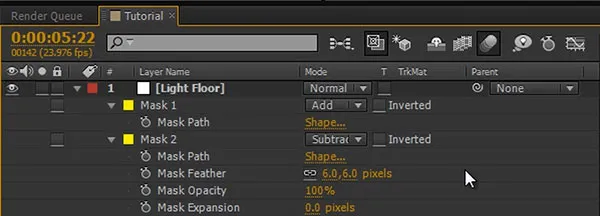
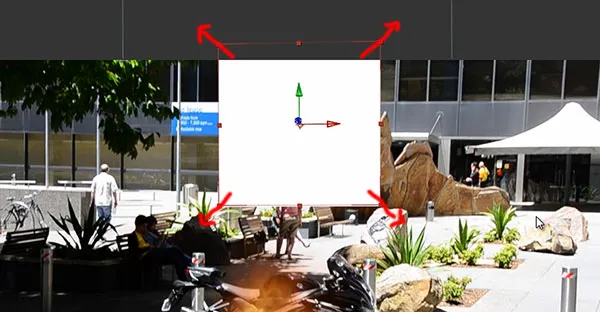
Open the settings for the solid by selecting it and pressing CTRL/SHIFT + Y, change its colour to white and call it ‘Light Floor’. Next, scale it up to cover most of the ground in the scene.
Add a rough mask over the area that would receive most of the light from the explosion and feather it out. Scrub through your shot to ensure the layer and mask cover all the areas you want to receive light in the final effect.
Now, animate the opacity of the layer to fade in when the explosion strikes and then fade out very slowly as the fireball disappears.

I am going to add a small mask just on the curb because the area would remain in shadow and it will make the light look a little more realistic. Set the mask mode to subtract to remove the curb part from the Light Floor layer and add a tiny bit of feathering.
I know the lighting doesn’t look right, but remember this isn’t the final lighting layer, this is just the matte we will use on top of our lighting layer. If you are confused about mattes, check out my detailed Adobe After Effects Track Mattes tutorial.

Now repeat the process and create a light layer for the back of the scene. Again, select a flat area on the back wall in the tracked 3D scene and create a new solid.
Scale the solid up to cover the entire back area of your shot.
Add masks with different opacities to cover the different areas of your background. Remember, the brighter you make the masks, the more light the areas will receive. The more detail you add, the more realism you will add to your final motorcycle explosion VFX.
Again, animate the opacity of the back lighting matte to be in time with the motorcycle explosion
Playing back the scene, the ground the bike is standing on as well as the background of the scene should turn nice white and then the light layers will fade away.

Now let’s create the actual lighting layers. We want to use the shot of the scene without the motorcycle in it for the lighting layer.
This means that we need to pre-compose our base footage, the camera and the clean plate layer we added to hide the motorcycle.
Because we have other 3D elements in this composition and they depend on the camera, you first need to duplicate the camera in the composition.
Once you’ve duplicated the camera, select the clean plate layer, the original camera and the original footage layer and pre-compose them by pressing CTRL/SHIFT + C
![]()
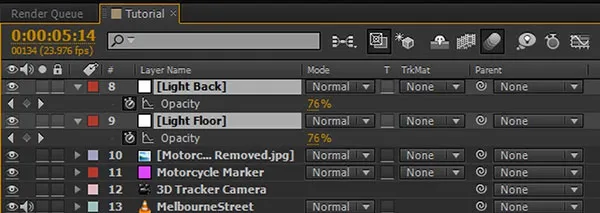
I will call this composition ‘Motorcycle Vanishing’. Duplicate the new composition and place the copy directly below the Light Floor layer. Set the blend mode of this copy to Add and set the track matte option to ‘Alpha’.

Duplicate the Motorcycle Vanishing composition again, move this copy below your Light Back layer and set the blend mode to Add and the track matte option to Alpha. Both the Light Back and the Light Floor layers should now be set to invisible as they are being used as track mattes onto the two copies of the Motorcycle Vanishing layer.
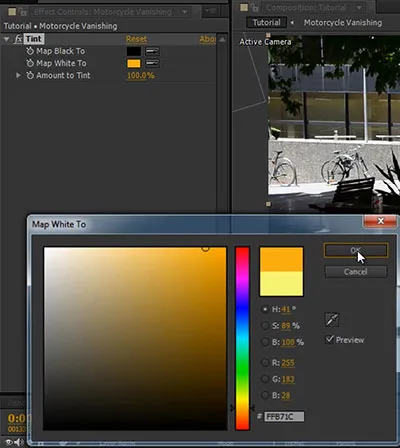
The new lighting layers (Motorcycle Vanishing layer with Additive blend mode) will be visible wherever the layer directly above them is opaque so the white of our Light Floor and Light Back layers now controls how strongly we see the additive light.

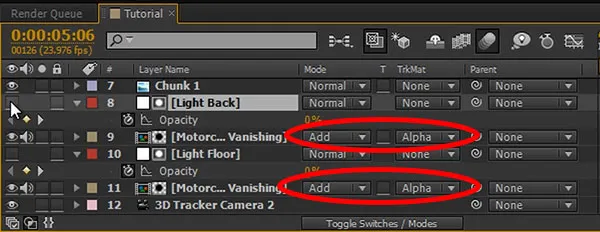
That looks quite cool, but I think the lighting looks a little bit too cold. Let’s add a bit of warmth to the light to match our explosion. For this, apply a Tint effect to your lighting layers. Change the Map White To colour to yellow or orange to match your fireball.
This looks much more like the lighting you’d expect from a fiery explosion. Adjust this to your liking.
It’s a pretty cool effect already, but let’s make it even cooler by adding some finer shrapnel particles to the explosion!
Adding Shrapnel to the Explosion
I will disable the visibility of the explosion layers just so it’s easier for us to see what we are doing.
We want our shrapnel particles to be bits and pieces of the motorcycle and for this, we will first need to create a small composition that contains all the images we want the particles to have.
Create a new composition by dragging an image of the motorcycle (I am using the frame I used to create my clean plate again) onto the ‘Create New Composition’ icon.
Reduce the duration of the composition to a few frames. Trim down the image layer to be only a single frame long.

Apply a hue/saturation effect to the layer and bring down the saturation and lightness to make the bike look dark and charred as before.
Then duplicate the layer a few times and shift each frame over to stagger them until your composition is filled.

Now go through the individual layers and cut out a different small piece of the motorcycle for each layer. These bits will be the shrapnel particles we will spawn for our explosion so I recommend picking parts that aren’t too distinct.
Finally, move all the motorcycle bits into the centre of the composition and reduce the resolution of the composition to barely fit the layers.
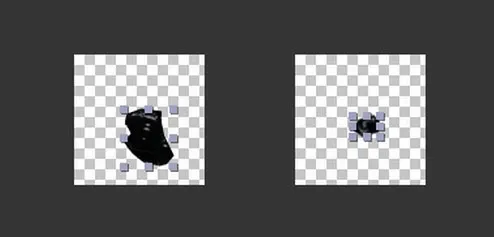
I will rename this new composition we created to ‘Shrapnel Particle’.
You should end up with a small composition with one frame for each different motorcycle piece in it.
Go back to your main composition and drag the Motorcycle Particle composition into your explosion.
Ensure the layer starts exactly when the explosion hits.

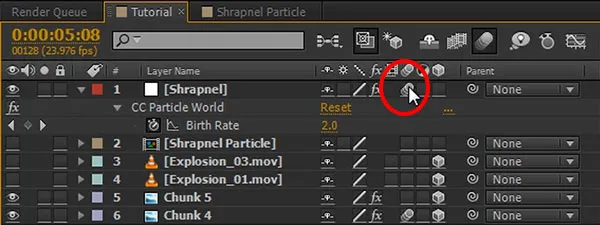
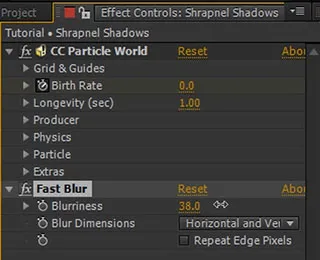
Now it’s time to create the particle layer. Create a new solid and call it ‘Shrapnel’. Apply the CC Particle World effect to the layer.
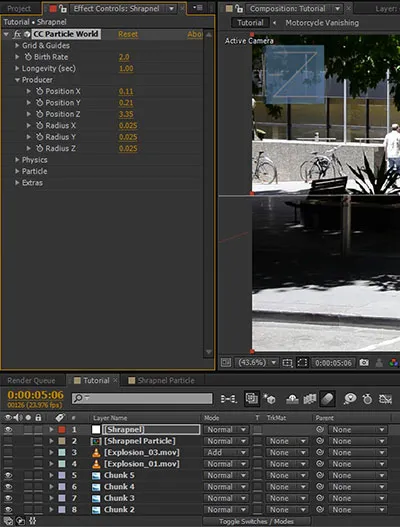
I wish the particle world effect used the same scale as the scene, but unfortunately it does not so we have to do a bit of manual set-up. Open up the Producer options and move the producer in X, Y and Z coordinate to position it as best as you can at the same position as the bike. Scrub through your footage to make sure it sits at the right depth and follows the shot correctly.
Ensure the particle layer starts at the same time as your explosion and - this is important - at the same time as your Shrapnel Particle comp that contains the bits and pieces of the motorcycle we want to use as particles.
Now animate the Birth Rate of the CC Particle World effect to start at 0. Move forward one frame and set the Birth Rate to 3. Move forward another 2 frames and set it back to 0.

This will cause a small burst of particles to be emitted from the producer. In this screenshot they are still small orange streaks and might be a little hard to see.
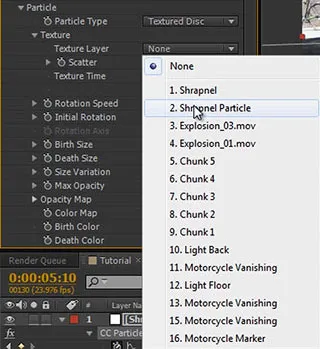
Let’s change the particle to use the frames of our Motorcycle Particle composition. Open the Particle options and change the Particle Type to Textured Disc.
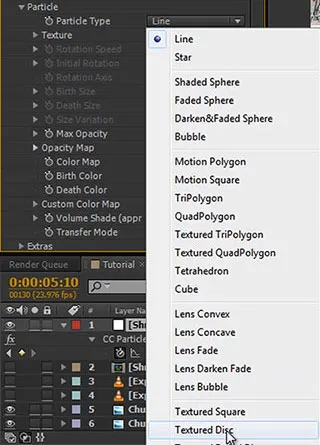
Expand the texture, set the Texture Layer to the Shrapnel Particle and the Texture Time to birth.
Birth tells all particles emitted at this moment to take the current frame from the Texture Layer and freeze the animation.
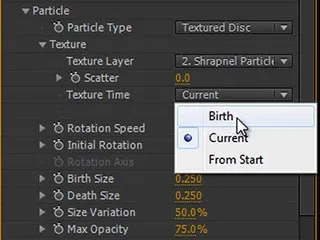
This is why it’s so important to have the Shrapnel Particle layer positioned at the moment you are emitting the particles! If it’s not at the right time, the particles will not be able to select the current frame when they are spawned and will end up being invisible.
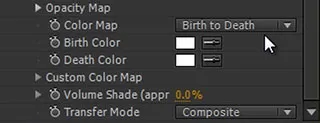
Now change the start and death size to something fairly big like 10 and change the Birth and Death Colour to white as we do not want to tint our particles. Also set the opacity to 100% because we don’t want the motorcycle shrapnel to be semi-transparent.
Open the Physics tab in the CC particle world effect and ensure the Animation is set to Explosive.
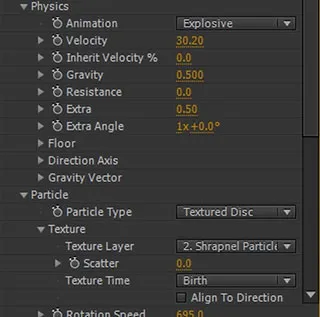
Increase the velocity to around 30 to have the particle shoot out from the motorcycle when it blows up. Scrub through your footage and tweak as required.
As I mentioned before, motion blur is important for realism so I will enable the option on the particle layer effect layer.
Re-enable the explosion layers and check out the explosion effect we have so far! Starting to look good!

Let’s also quickly add some soft ground shadows to the particles. Simply duplicate the Shrapnel layer and call it ‘Shrapnel Shadows’.
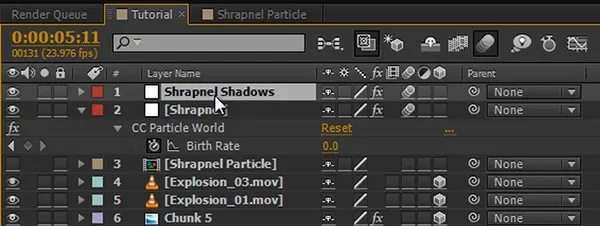
We now need to position this layer on the floor and since we already have a layer that is positioned in the floor, our Light Floor layer, we can simply copy the position and orientation from the Light Floor layer over to our Shrapnel Shadows layer.
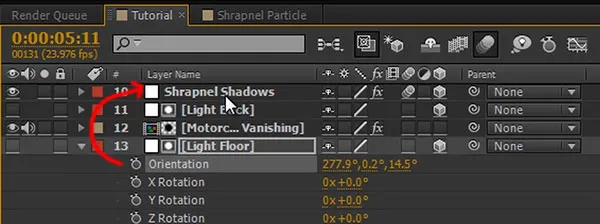
The Shrapnel Shadows layer should now sit nicely on the ground, we just need to position it a bit better and scale it up to suit our scene.
Search for the Fast Blur effect and apply it to the shadows layer. Increase the Blurriness until your shadows are nicely blurred out.
If the shadows come out too harsh, you can lower the opacity of the layer to around 50%. Here is out scene with the shrapnel particles shadows added.

Because no vehicle explodes without some smoke, let’s add a black smoke cloud into our shot.
Adding Smoke
Again I am going to use a smoke charge element from Action Essentials 2 by videocopilot but again you can find free option detonationfilms or footagecrate. Drag the smoke element into your composition and time it to start at the same time as the explosion.
If your smoke charge appears to be a bit too slow, you can speed it up by applying a time stretch effect. For this, right click the layer and select Time->Time Stretch. Since this is a pretty instant explosion, I like to speed up my smoke to around 30% of the original duration. Now, with the smoke that I am using, the smoke is all white and I want an angry black cloud.
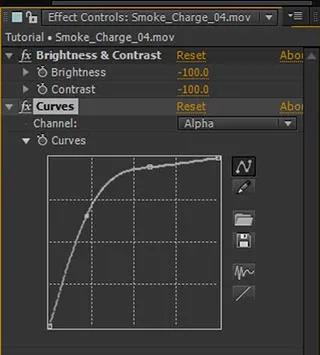
We can fix this quite easily by applying a brightness & contrast effect to the layer and reducing both brightness and contrast to -100.
For further adjustments, you can also add a curves adjustment to the smoke charge and bump up the alpha channel to make the smoke a little more opaque and not so… dainty. We want angry smoke!
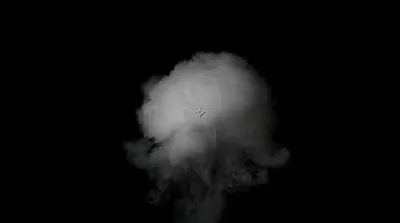
Here is the final angry black smoke cloud after all the colour and brightness adjustments applied:

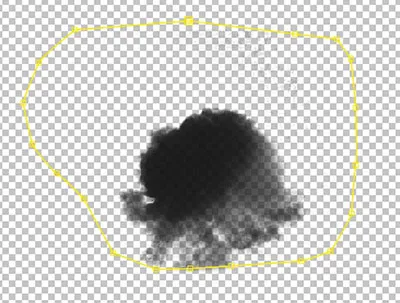
If there are any artefacts around the corners of your black smoke you can remove them by applying a simple mask and feathering out the edges.
We now need to position this smoke element in our explosion. For this, turn the layer into a 3D layer and copy the position and orientation of one of the already placed explosion layers over to our smoke layer.
![]()
Scale the layer up and position it so it sits nicely just between the two explosion elements. You may have to tweak it a little bit so it sits into the scene just the way you want it to.
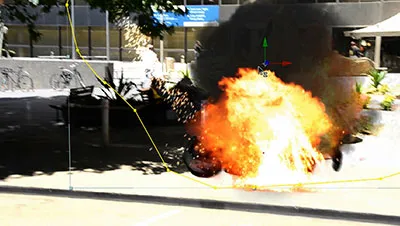
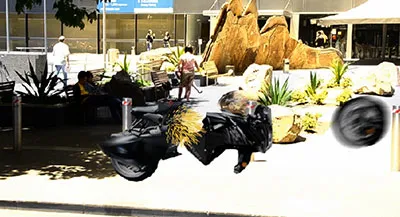
Here is the final motorcycle explosion with chunks, explosion, lighting, shrapnel, shrapnel shadows and smoke added. Lookin’ pretty cool!

Remember, you can add as many elements into the scene as you need to make the explosion look exactly like you want. We covered all the techniques you need in this tutorial so far.
Finally, let’s add some camera shake to finish off this effect!
Adding Camera Shake
Select all layers and precompose them!
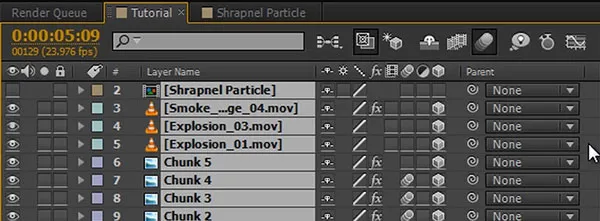
I will call this composition ‘Motorcycle Explosion’.

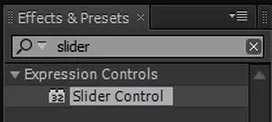
Now we will add the camera shake exactly like I did in my Basic Explosion tutorial. First, add a Slider Control effect to the layer.
Reveal the position property of the layer and alt click on the stop watch icon to enable the expression editor. Into the text field, type
’wiggle(20, ‘
and then use the pickwhip icon to select the value of the slider effect to insert it into the expression.

Finish off the expression with ’);’. The final expression should say something like ‘wiggle(20, effect(“Slider Control”)(“Slider”));’.
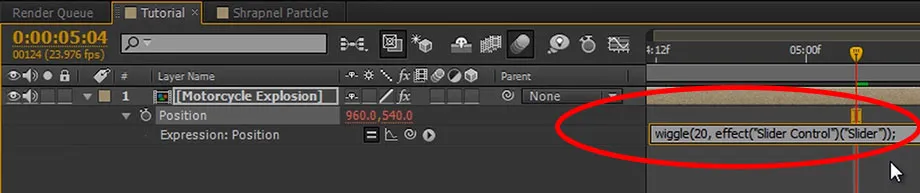
The value of the slider now controls the amount of random offset that will be applied to the position of the explosion layer. Animate the slider to increase from 0 to around 100 when the explosion hits and then slowly decrease back to 0.

This will cause the layer to shake when the explosion hits. You will see the background of the composition when the layer moves around but you can fix this simply by scaling the layer up as needed. Alternatively you could use the Motion Tile effect to mirror the edges of the layer as it moves around during the shake effect.
Finally, enable motion blur on the layer to add some realism to the shake effect.

And with that, your final motorcycle explosion effect is done!