 Surfaced Studio
Dissolve Into Crows 3D VFX – Part 1
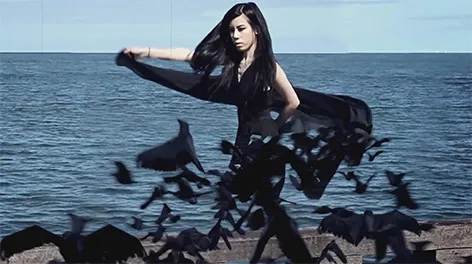
In this tutorial we will be using Adobe After Effects in conjunction with 3D Studio Max and Particle Flow (pFlow) to create an awesome VFX of a person dissolving into a murder of crows. This is an advanced tutorial so if you are just starting out, I recommend starting with my beginner or intermediate tutorials.
Since this tutorial is rather long, I have broken it up into 2 parts. In the first part we will look at spawning and rendering a murder of crows in 3dsMax using Particle Flow (pFlow).
Filming your Footage
The very first thing you will need to do to create this effect is to film your base footage. I recommend putting your camera on a tripod to avoid having to motion track it later. For my video I took a shot of Celina from Fables In Fashion at a pier out in Melbourne, spinning around. I also took a second clip of the empty pier as my clean plate. Since your actor will dissolve, you will need at least a couple of seconds of footage without them in the scene.

Preparing Your Footage
Now import your footage into Adobe After Effects and create a new composition with the clean plate footage (the one without your actor) in it. Add the footage of your actor on top and rotoscope out your actor (including their shadow) for the duration of the effect. Then pre-compose the rotoscoped layer. In my scenario I ended up with a ‘Celina Roto Comp’ layer on top of my clean plate.
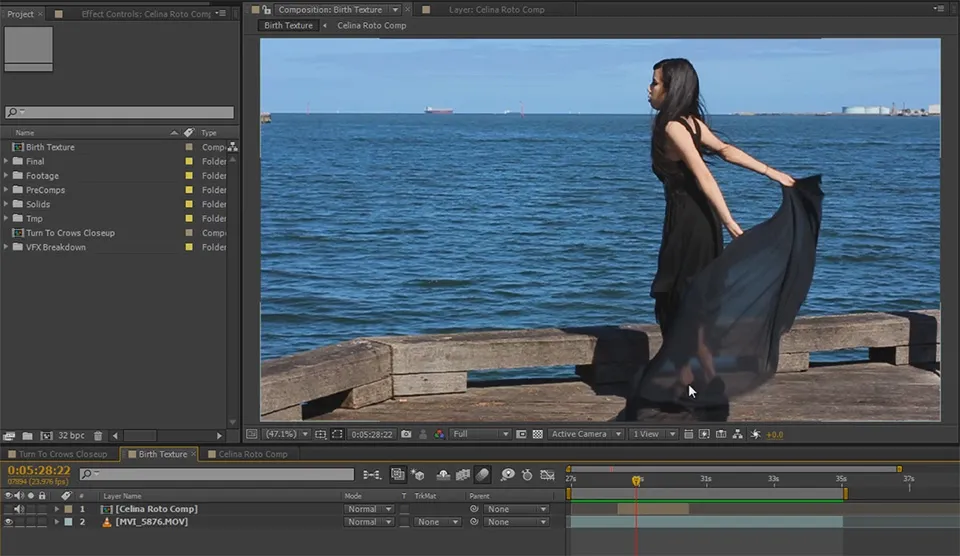
Let’s look at how we will set up our particle system in 3dsMax!
3dsMax Particle Flow Birth Texture for Spawning Crows
We will set up a particle system in 3dsMax where each particle will be an animated 3D model of a crow. To make this effect look realistic, we need to spawn the crows correctly where the person is standing. I want the crows to spawn gradually from Celina’s feet to her head just as she is spinning around.
To achieve this, Particle Flow, the particle system available to us in 3dsMax, has a particular type of particle source called a birth texture. The birth texture allows you to use the any object in your scene and spawn particles from the bright areas of the (animated) material assigned to it. We can set up a plane in 3dsMax to match our scene and assign an animated texture to it that defines where our crows will emerge during the animation.
Here is what an animated material spawning particles might look like in 3dsMax.

In order to spawn the crows exactly where Celina is standing gradually from her feet to her head, we need to first create the animated texture that defines where they will spawn. We want an entirely black image where a white stripe swipes up Celina’s body exactly where we want the particles to be emitted.
Apply the Colorama effect to the layer inside the pre-composition and set the output to a solid white. This should give you a solid white silhouette of your actor for the time span where you want the crows to spawn.
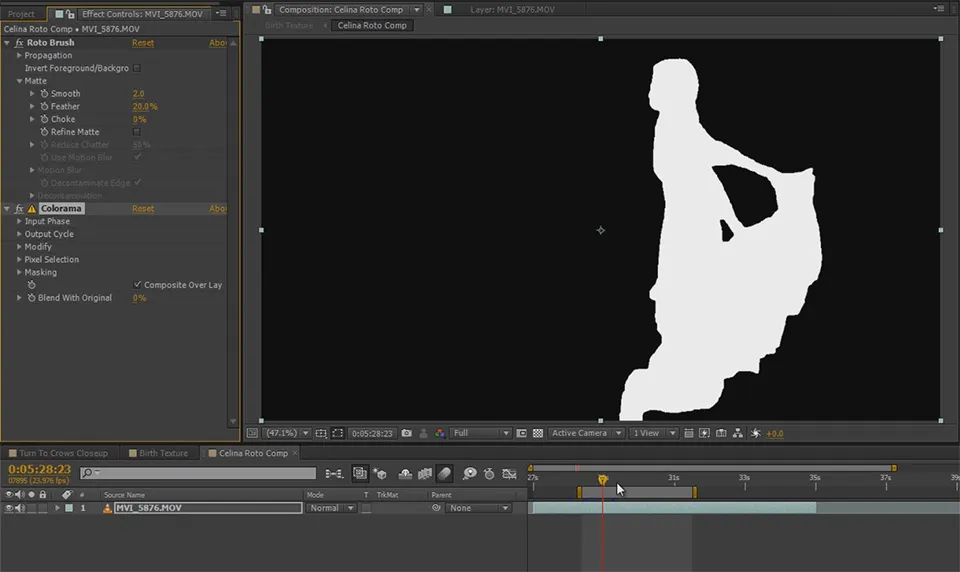
Now go back to your parent composition and apply a simple animated mask to mark the area where you want the crows to spawn and when. Mine sweeps up from Celina’s feet to heir head while she is spinning.
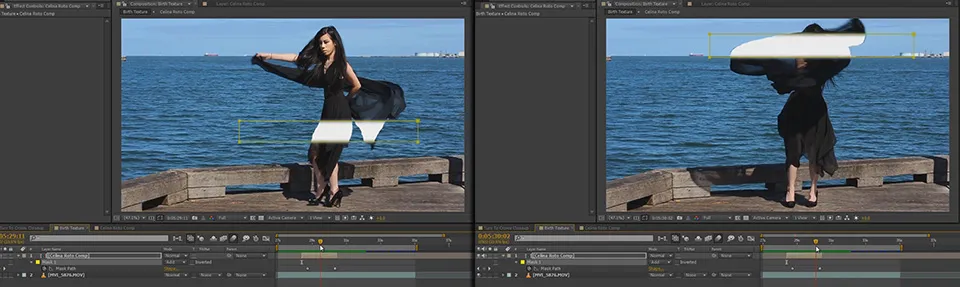
We will use this white strip for the birth texture material in pFlow to define the area where we will spawn the crows during the animation. Of course we don’t want anything of the background to be in the birth texture material, so disable your base footage when rendering your comp and render it out as an image sequence.
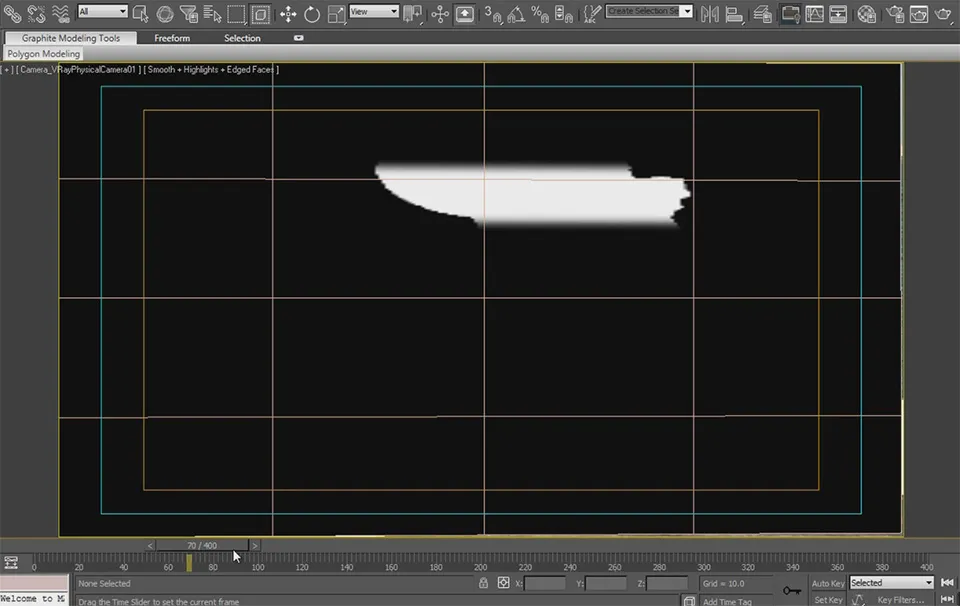
You should end up with a black scene with nothing but the white strip defining where the crows will be spawned.
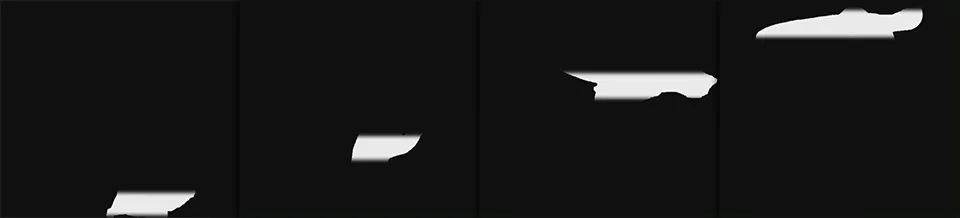
Also render out the actual footage you have shot (including the actor) as an image sequence. We will use this as an animated background in our viewport to act as a guide when setting up the effect.
But now it’s time to get get our feet wet and jump into 3dsMax!
3dsMax: vRay vs Scanline Renderer
Personally I am a big fan of the vRay renderer in 3dsMax and that’s usually the way I like to set up my own project. However, things can get rather complicated when working with vRay and if you are working with the default Scanline renderer, some things might look slightly different when you follow this tutorial.
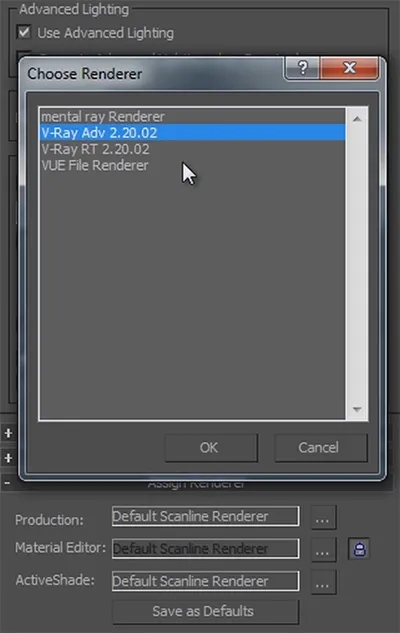
But don’t worry! All the techniques described here apply just the same and I will highlight any potential differences. vRay can be very complex to manage, but if you are using vRay I will assume that you know how to deal with those things already.
Setting Up the Geometry and the Camera
I have created an empty project and have set the image sequence for my base footage as the background of my viewport. If you do not know how to do that, check out my 3D Integration VFX Part 4 tutorial where I show you what you need to do.
We want the crows to animate quite a bit past the point where your actor disappears. In my setup, I have made the animation in 3dsMax longer than the image sequence I exported from After Effects. This won’t cause any issues, it just means that the background animation in the viewport will stop once you scrub past the length of the image sequence.
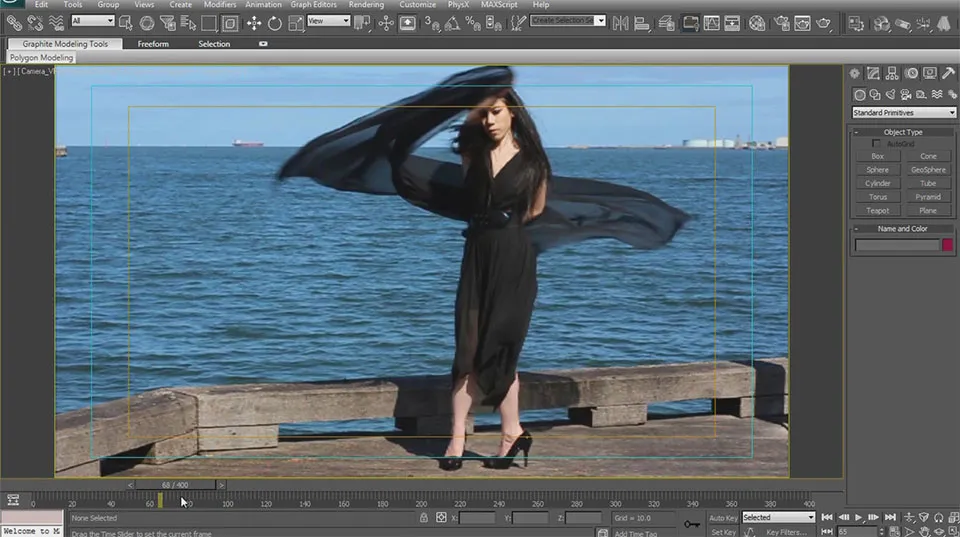
The first thing you have to do in 3dsMax is to re-create the geometry of your scene. For me, that meant modelling out the pier that Celina is standing on. Since this geometry will be used to obscure any 3d objects behind it as well as receive shadows from any 3d objects in your scene, it is important that you do this as accurately as you can.
Since my shot contained only the pier, I modelled my pier from simple shapes in 3dsMax.
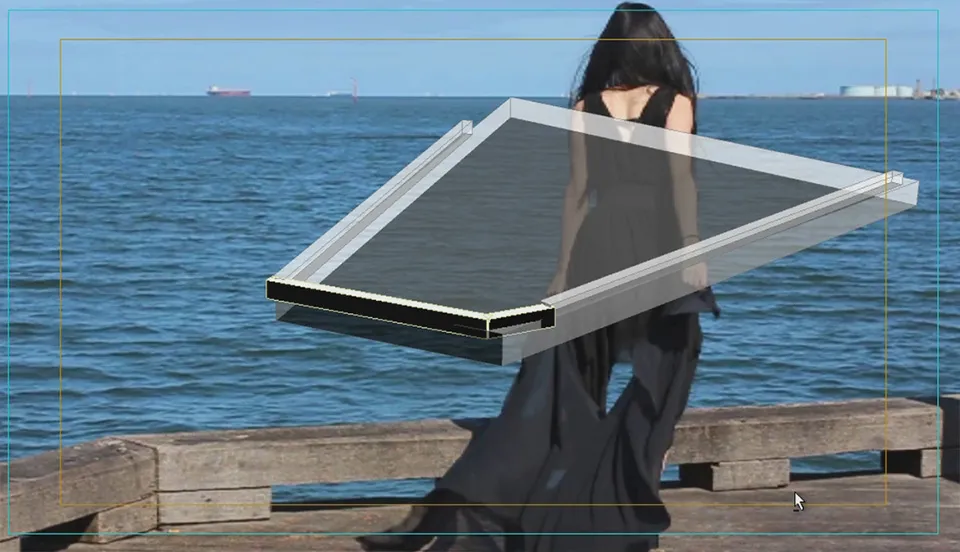
Time to set up our virtual camera so we can see the virtual geometry from the same angle as the real footage we shot!
Setting Up the Virtual Camera
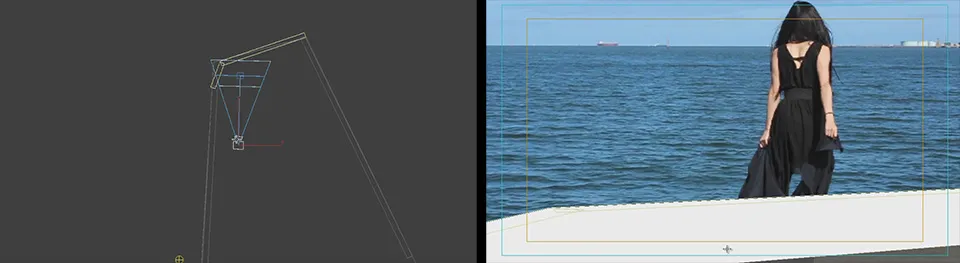
The second step is to set up your virtual camera to match the physical camera you used to film your scene. Fortunately for me, this scene was shot with a static camera so I did not have to perform any complicated camera tracking. I simply set up a vRay camera and positioned it at the same point my real camera was in relation to Celina and the pier.
In the camera settings, whether you are using vRay or the standard camera, you have to ensure that all your settings match the camera you used to film the scene. These include focal length, aperture, shutter speed, ISO, white balance and more. The more accurately you set this up, the better the rendered elements will fit onto the original footage.
Finally, switch your 3dsMax viewport to use this camera and hopefully the geometry you modelled will line up perfectly with the footage we used as animated background. If it does not, you might have to do some tweaking on either the geometry or the camera.
Next, let’s set up the lights in your scene!
Let There Be Light!
Just like with the camera and the geometry, you want to try to simulate the conditions under which the footage was filmed as accurately as possible. Create lights for any light sources that existed during the shoot and adjust them as best as you can to replicate the real lights.
I decided to add 3 lights in total. First, I added one very large directional light to simulate the harsh sunlight and positioned it at the correct angle to the camera and the scene.
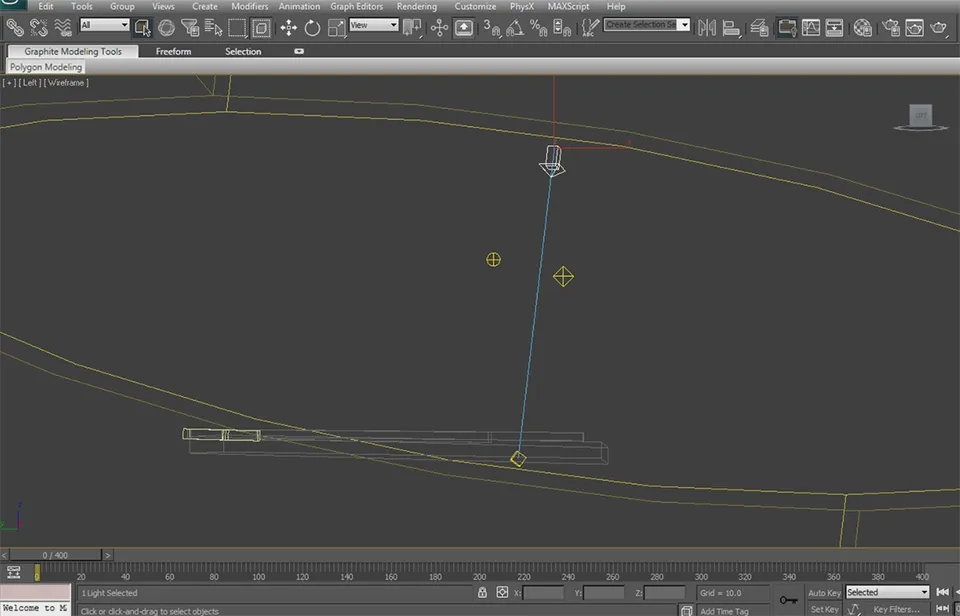
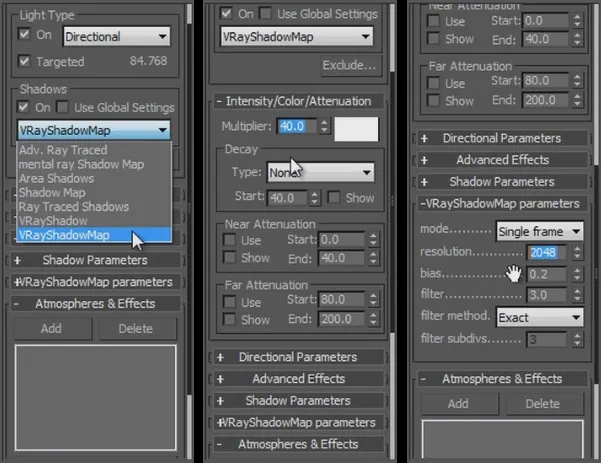
I set the intensity of this light pretty high because it was a sunny day when we shot this scene and I wanted this light to be just as harsh.
To make this effect realistic, it is important that you enable the shadow options on the primary lights you use in your 3dsMax scene. How you set up the shadows will vary depending on whether you are using vRay or the default Scanline renderer, but here are some general guidelines:
- Ensure you enable the shadow option for all lights that represent real light sources that existed when you filmed the scene
- If you are using a shadow map, ensure that the resolution of your shadow map is sufficiently high so you get the right level of detail into your shadows
- Ensure that the light intensity and colour matches your scene as accurately as possible
Tweak as required until you are happy with the setup. Don’t be shy and render out a couple of tests to get the lights set up correctly.
Since a virtual 3d scene will be absolutely black if no light hits the surfaces directly (unless you use global illumination) and in the real world there is a level of ‘ambient’ light due to reflection, I added a very weak ambient light into my scene just to avoid 100% black areas.
Now with the basics out of the way, let’s move on to setting up the particle system using pFlow. This is going to get a little more complicated so hold on to your socks!
Setting Up the Birth Texture
We are going to use a plane in conjunction with the birth texture operator to spawn the crows from the animated bright parts of the material of the plane. First, let’s set up the plane!
Place a plane at the precise location where you want the crows to be spawned. In my case, I want the crows to be spawned where Celina is standing, at the end of the pier. Make sure the plane faces the camera straight on and fits over the viewport precisely. This ensures that our image sequence for the birth texture matches the base footage we set up as the viewport background.
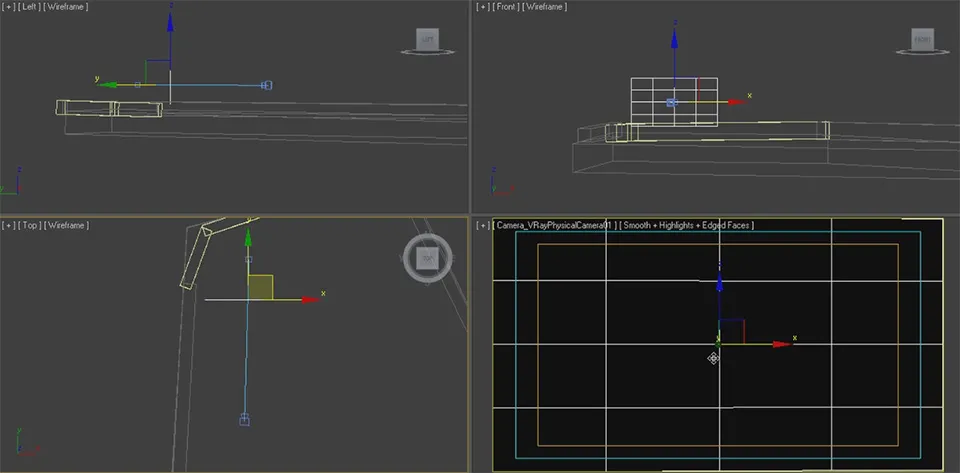
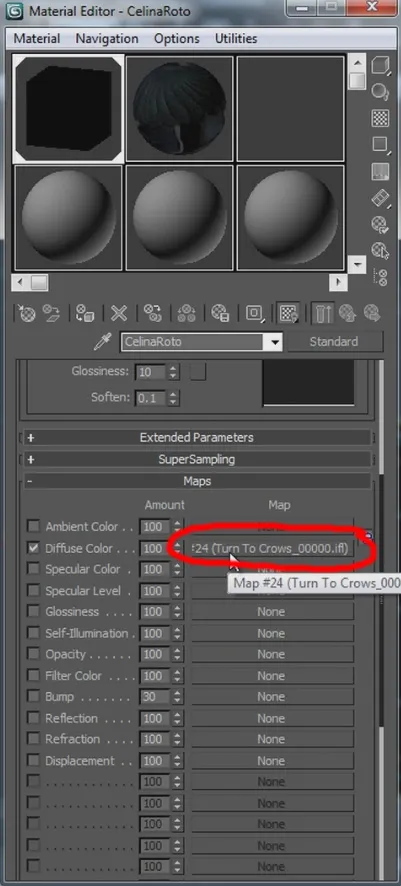
Next, we need to assign the white swipe image sequence we exported from After Effects to this plane. For this, go to the material editor (shortcut ‘m’) and create a new basic material. Open the diffuse slot and select the first image of the swipe animation image sequence. Ensure that the ‘Sequence’ check box is ticked and that the number of frames matches the length of your animation.
When assigning any animated texture to an object in 3dsMax, make sure you set up the end condition of the texture correctly. For this effect, we want the animation to hold the last frame once it’s done playing so ensure you tick the ‘Hold’ option on the texture.
If you now maximise the camera viewport and play back the animation, you should see the material animate as expected and a white strip should move from bottom to top across the screen in time with when you want the crows to be spawned. It can be helpful to enable the plane’s see-through property so you can ensure the material animation matches up with the footage of your actor.
Now let’s get to the scary stuff and jump into Particle Flow!
Getting Down and Dirty With 3dsMax Particle Flow
Nah, I’m just kidding, it’s not that bad, but Particle Flow is fairly complex so be prepared. Press 6 on your keyboard to open up the Particle Flow window.
In pFlow you define the process from the birth to the death of a particle as a sequence of event nodes. A particle’s life ‘flows’ from node to node and at each node, a number of operators controls what happens to the particle at that stage in their life.
You can create a new particle flow by right clicking into some empty space in the window and selecting New —> Particle System —> Empty Flow. In the screenshot below I have already set up my entire flow, but I have greyed out all items except for the source and the birth event so we can concentrate on them.
The source event node at the top just defines the particle spawn event. It gets interesting once we start to look at the operators in the ‘Event 01 node’. The first item in that node is the PFlow_Birth Texture operator. You can drag this operator into your flow from the event list at the bottom of the pFlow window.
When you select the birth texture operator, on the right hand side you will see all of its options.
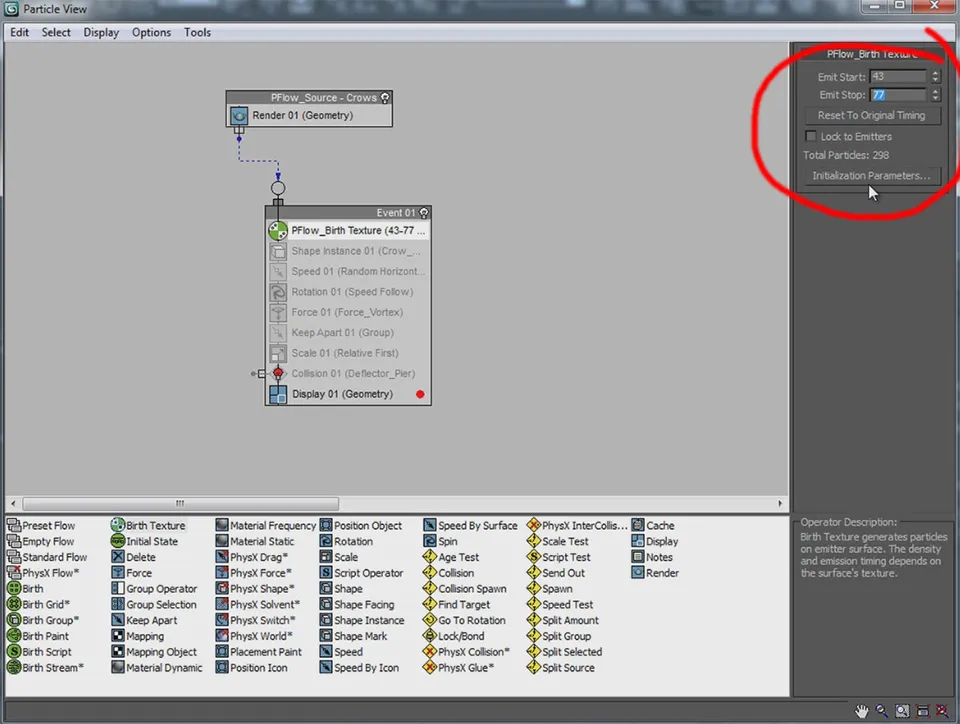
The Birth Texture operator has a Start and End Time to define when you want your particles to be emitted and if you click on the Initialisation Parameters button below, you will be taken to the modifier panel where you can set up all the other options for the Birth Texture. Here you can define the number of particles to be spawned and - most importantly - the emitter objects.
Add the plane with the white stripe material to the list of emitter objects. Ensure you tick the animate emitters check box since the material of the plane is animated.
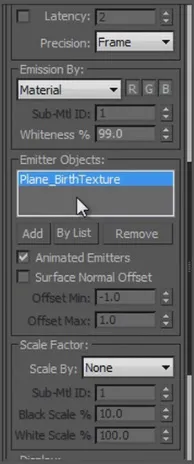
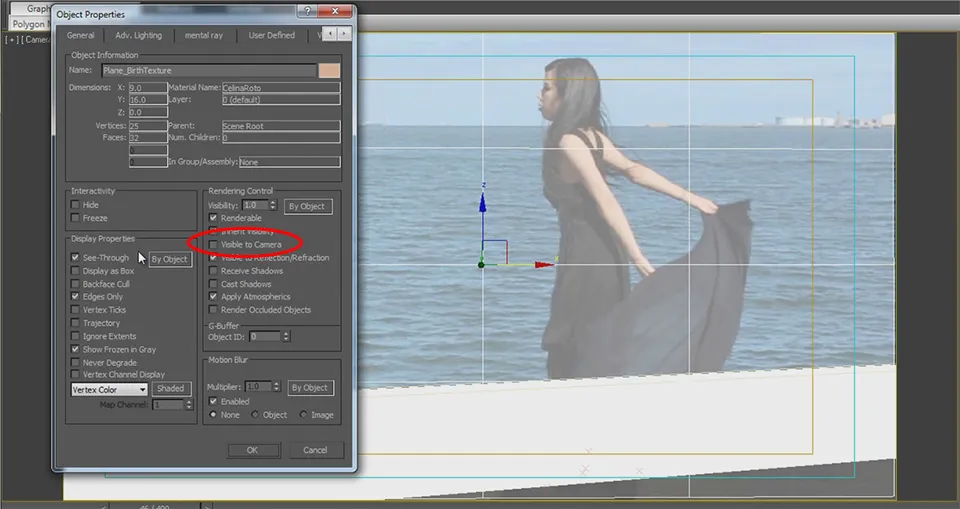
In our final render, the plane is merely used to define where the crows will be spawned; we do not want to see it in the rendered image. You can hide the plane by disabling the ‘Visible to Camera’ check box in the object properties.
If you now rewind your animation and play it back you should see little ticks appearing in your scene exactly where your birth texture material is white at the time. These little markers are our particles that we will soon turn into fully animated 3D crows.
You can disable the see-through property of the plane (temporarily) so you can verify that this is working correctly. 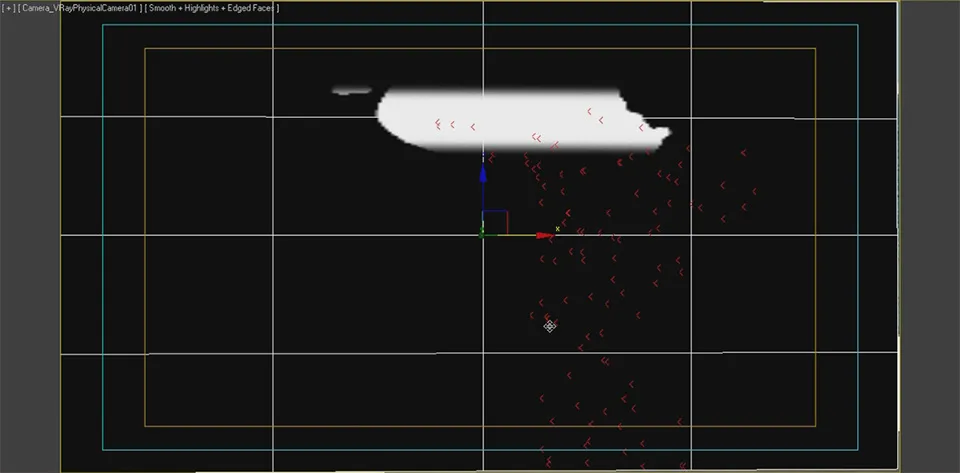
And if you once again hide the plane, you should see the red ticks appear over your actor in sync with the animation of the viewport background.
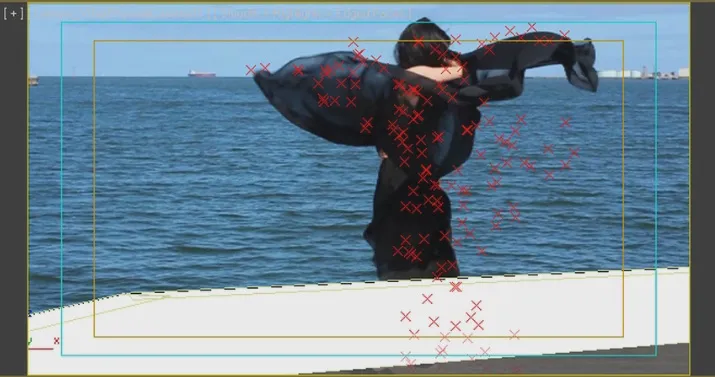
Time to get fancy with the particles!
Configuring the Particle Flow Particles
Since we want actual animated 3D crows to be spawned instead of little ticks, I imported this crow model into my project. This model was created by my brother for one of his uni projects and you can download it here! Be kind and give credit if you end up using it in your own projects.
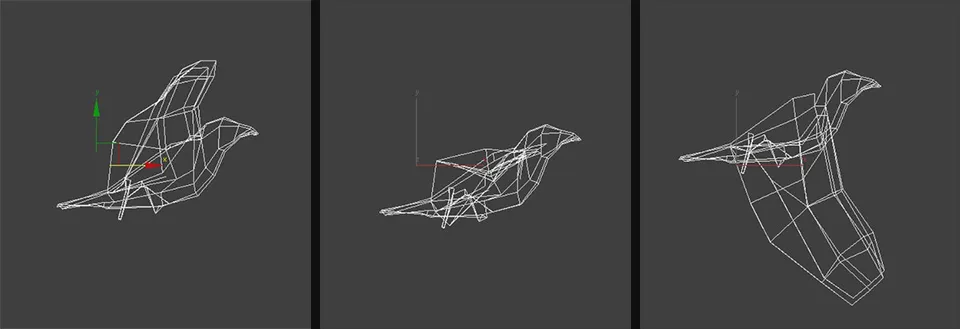
We now want to change the shape of the particles to use this animated crow model so return to the Particle Flow window. Down in the list of operators you can find the Shape Instance operator. Add this operator into your main particle event. You can disable and enable operators by clicking on their icon on the left side.
Select the Shape Instance operator and in the options on the right hand side pick the animated crow model as the geometry object. You can tweak the size and the size variation of your particles and you should not forget to tick the ‘Animated Shape’ check box.
Note that the preview window in 3dsMax will still just show you ticks for your particles. If you want the preview window to show the shape of the crows, add a Display node into your particle event and set the display mode to ‘Geometry’.
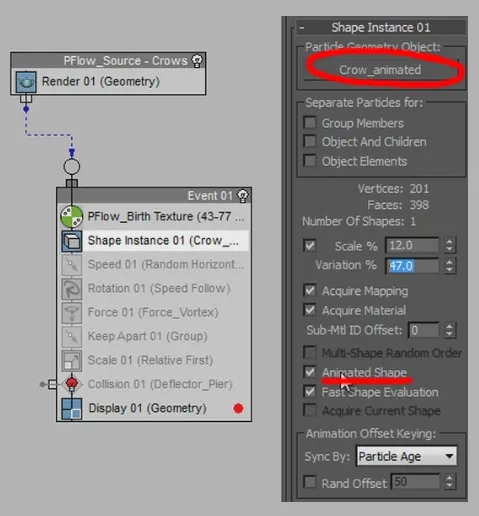
If you play back the animation now, instead of little ticks, you should see 3D crow particles being spawned in your scene instead. While they animate, they don’t move at all. Let’s modify our particle flow to get the crows to fly away from where they are spawned.
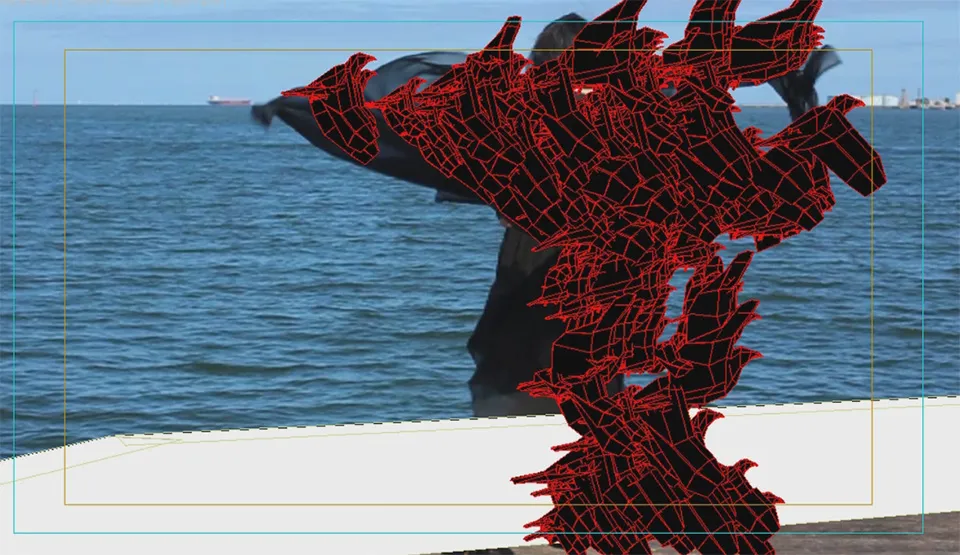
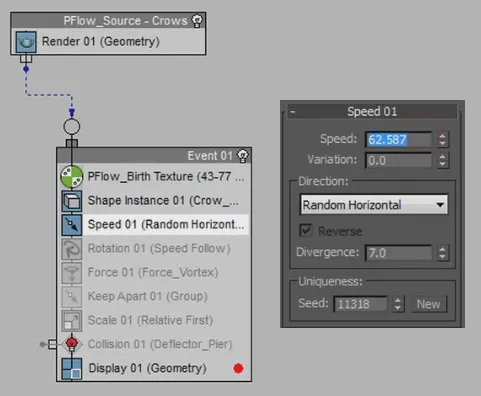
To achieve this, you can add a number of other operators to your particle flow. Add a Speed operator to your main particle event. You can use this operator to accelerate your particles and you can define which direction you want your particles to move. I set mine to ‘Random Horizontal’ with a bit of variance. Set the speed and the speed variation to whatever suits your scene.
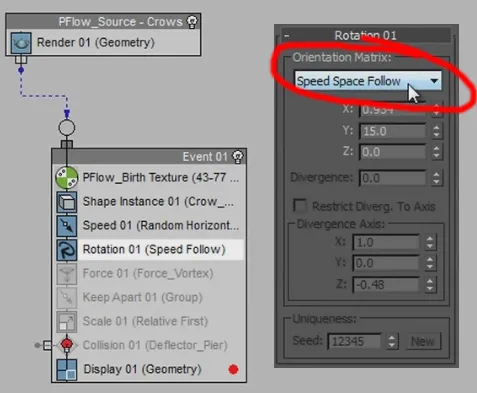
Since we want our crows to face forward as they fly, add a Rotation operator. Set the Orientation Matrix of the operator to ‘Speed Space Follow’. The crows will now face towards the direction they are moving. I added a tiny bit of rotation so they hold their head a little higher while they fly - it just looked more natural to me that way.
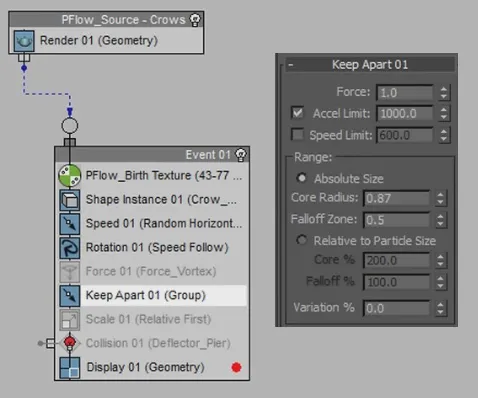
One other thing I added to my particle flow is a Keep Apart operator. While this operator doesn’t seem to always work perfectly, it does help to keep the crow particles from constantly intersecting with each other in an unnatural way. The main parameters to play around with are the Core Radius and Falloff Zone settings.
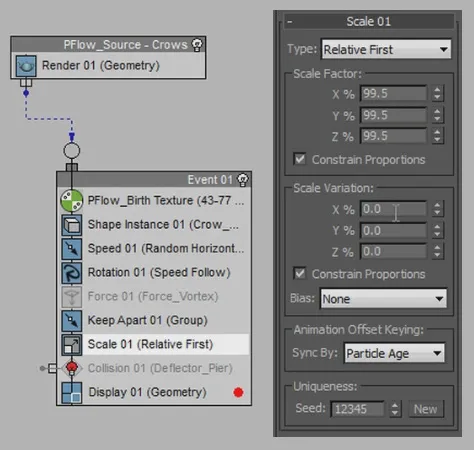
Finally, I also added another Scale operator to tweak the crows sizes a little bit. You can also achieve this by changing the scale setting in the Shape Instance operator.
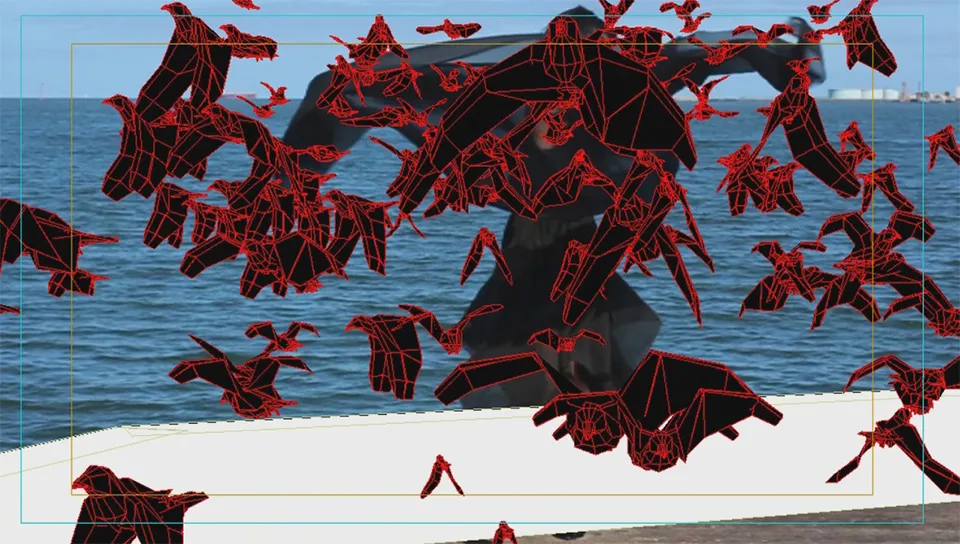
Once you are done setting up the basic movement operations for your crow particles, return to your 3dsMax viewport and preview your animation. Your crows should now be shooting out and away from your actor. That is pretty cool and we can see the final effect taking shape!
But we don’t do average here so let’s make the movement of the crows look a bit more organic.
May the Force Be With You - Adding a Vortex
In my scene, Celina is spinning as she dissolves into crows and so I wanted the murder of crows to twirl around her a bit like a vortex. I did this to more naturally translate her rotation energy into the direction of the crows and make the overall effect look more organic.
In order to achieve this, I added a Force into my scene, a Vortex force. You can create this Vortex Force object in 3dsMax by going to Space Warps —> Forces. When you select the Vortex you get a whole heap of settings in the Modify panel that you can tweak to your heart’s content.
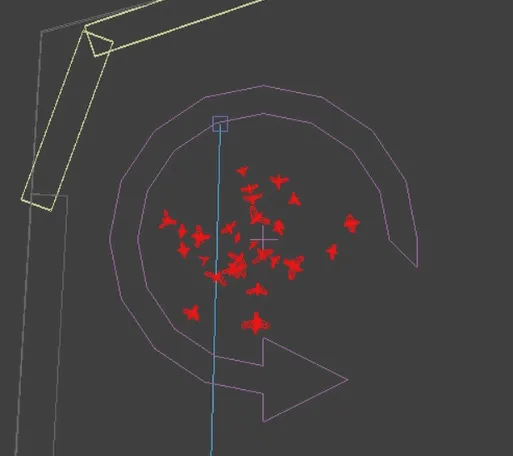
By default, this vortex (or any other force we add into the scene) will have 0 influence on our particles. This is because the force is not linked to the particle flow yet.
In order to link the force to our particles, return to the Particle Flow window and add a Force operator into the main particle event. In the parameters on the right side you can add the forces you want to have influence on your particles. You can also change the amount of influence these space warps have on your particles. I have linked my particle flow to the new Vortex force in my scene.
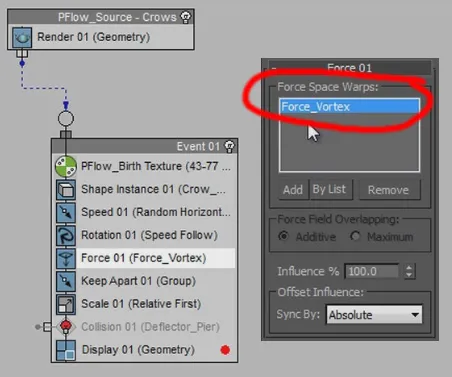
Once you’ve added added the desired forces and linked them up to your particles, your particles will be properly influenced by them. The Vortex force causes the crows to spin around Celina as she turns.
Using Deflectors to Prevent Intersecting Geometry
However, one thing that is likely going to happen when you move your particles around in your scene is that they will intersect and pass through the geometry you have set up. In the side view I can see the crows going through the floor of the pier.
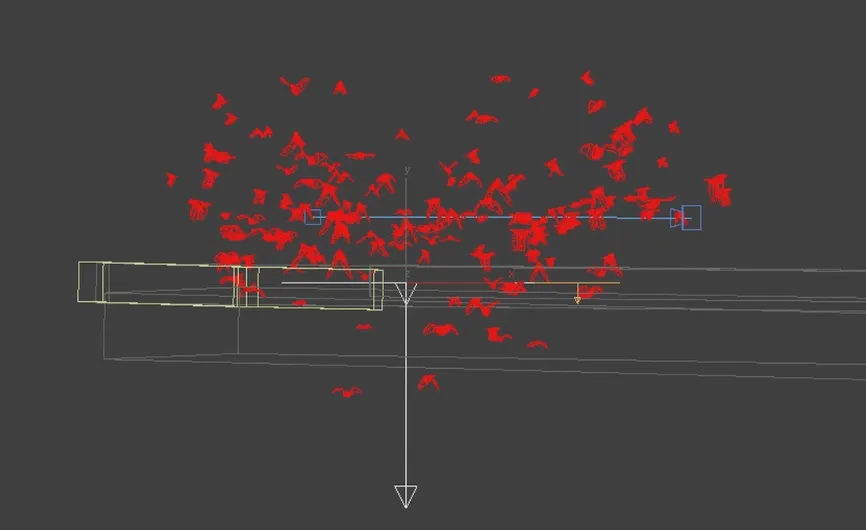
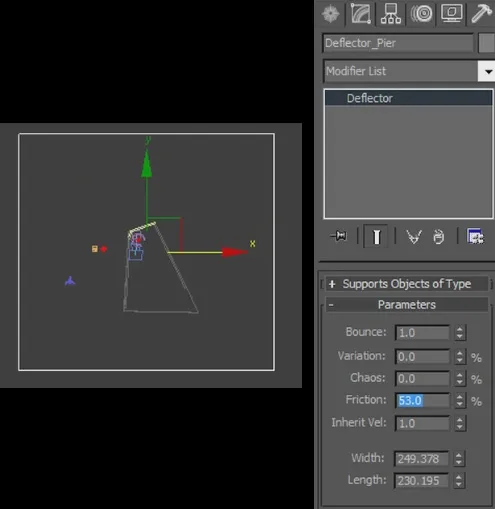
We can prevent this from happening by adding a deflector. You can add a deflector into your scene by going to Space Warps —> Deflectors in 3dsMax. I added a deflector over the ground of the pier.
Note that just like with the forces, you have to link your deflectors up to the particle flow for them to have an effect on the particles.
A deflector has a number of properties to define how objects colliding with the deflector should behave. Feel free to tweak this to your liking.
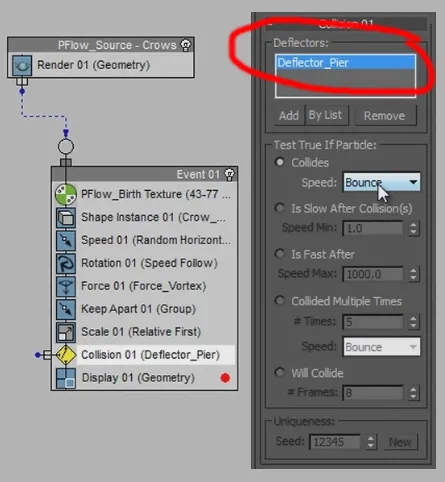
Now we need to link the deflector to our particles inside Particle Flow. For this you can add a Collision operator to your main particle event and select the deflector you added in the operator parameters. I will set the behaviour to Bounce and even though that might not be a very natural thing, it will prevent the crows from passing through the main part of the pier.
You can go into much more detail here and create physics and deflectors for all surfaces in your scene, but for simplicity and because the effect will only be a couple of seconds long, I only added this simple deflector. Looking at the side view you can see how the crows no longer penetrate the base of the pier.
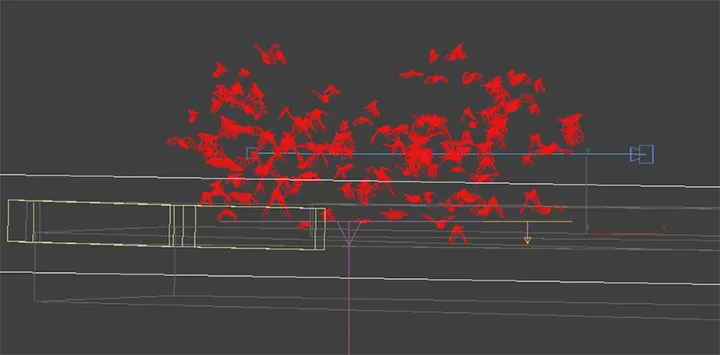
One important element we have yet to cover before we get to the rendering of our scene are shadow catcher materials!
Shadow Catcher/Shadow Matte Materials
Let’s render out a single frame to see what we got so far. Go to your render settings, make sure you select the camera you set up to replicate your real camera as the viewport and render out a frame. This is what I got about halfway through the animation.
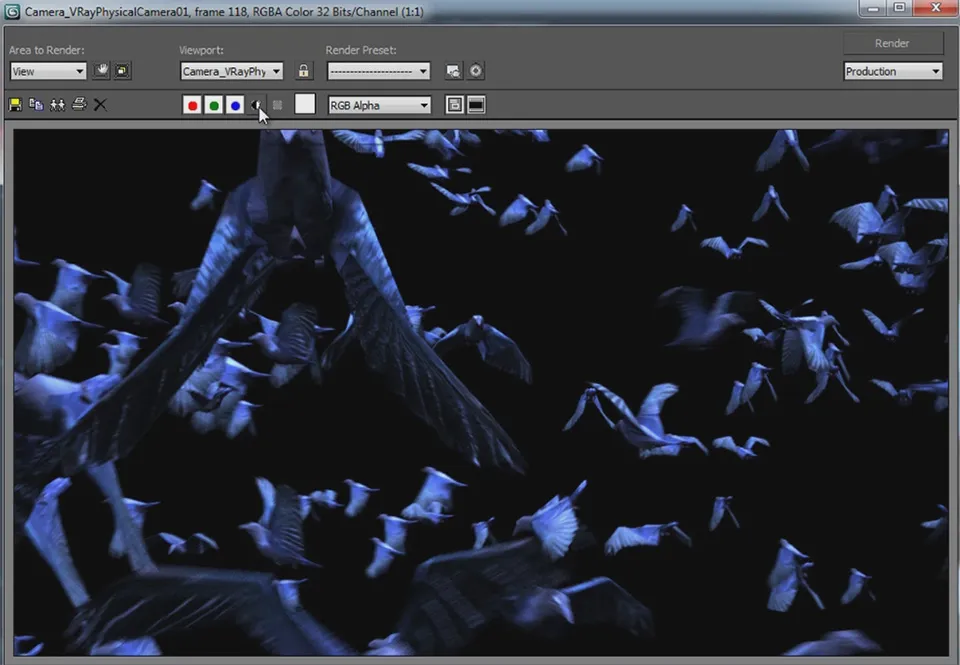
The crows are a little bit blue, but we can colour correct them during compositing. Also note that if I reveal my alpha channel for the render, the geometry of the pier does not actually show. It does however, correctly receive the shadows of the crows as generated by the lights (sun) in the scene.
To achieve this, you will need to use a special material called a Shadow Catcher or Shadow Matte on the geometry you set up in your scene. I first mentioned this technique in my 3D Integration VFX Part 4 – 3D Scene In 3dsMax tutorial.
Open up the the material editor. This technique is very different if you are using vRay, but if you are at a level of using vRay, I assume you know all about the vRayMtlWrapper and how to set it up as a shadow catcher material. If you are using a standard material, you can create a Matte/Shadow material that you can apply to your geometry.
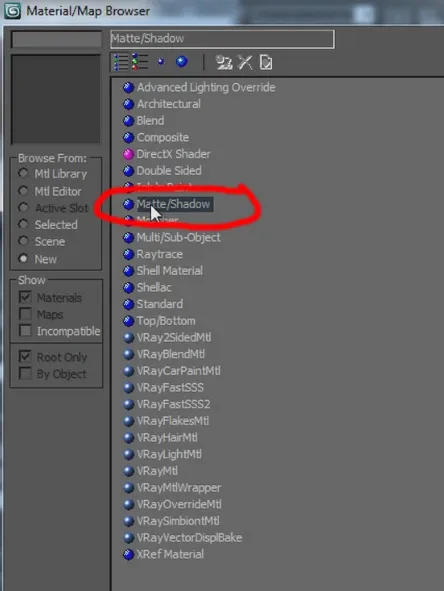
It is important that you configure a number of options on the Matte/Shadow material, namely:
- Ensure the Receive Shadows option is ticked
- Ensure the Affect Alpha option is ticked
With these settings, any geometry that you assign this material to will be invisible and not write to the alpha channel, but it will still receive shadows from other objects in the scene - just what we want!
Refining Your Crows Setup
Because I am a very picky person, I decided to add some floating bird feathers to the effect to make it look a bit more intricate. I won’t cover this part in too much detail here. I basically created an animated sphere that spawns feather particles as it moves up in unison with the crows spawning.
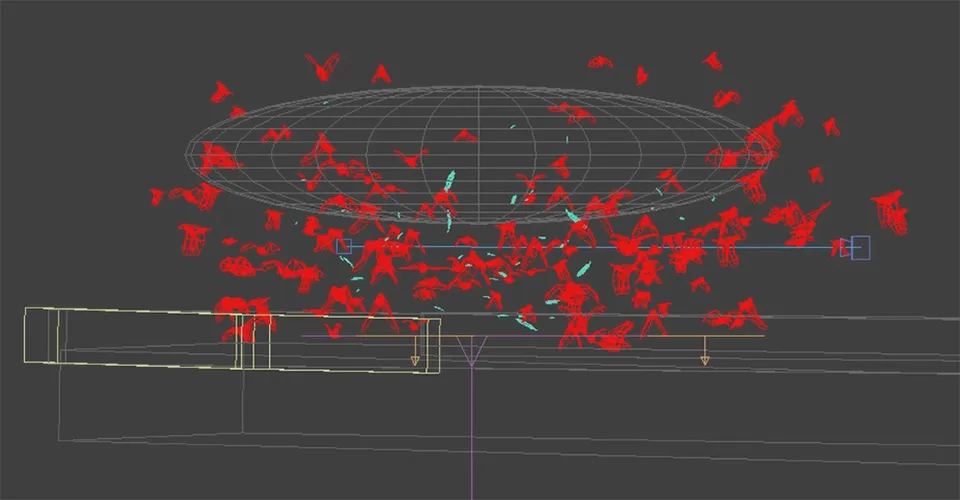
Here is a screenshot of the feather particle flow I set up. Most of it is very similar to the crows particle flow, but I used a Position Object operator to spawn the feathers on the surface of the sphere. I also added a Wind force into the scene to sway the feathers as they are falling down and, on collision with the pier deflector, I stop their movement so they come to rest when they hit the ground.
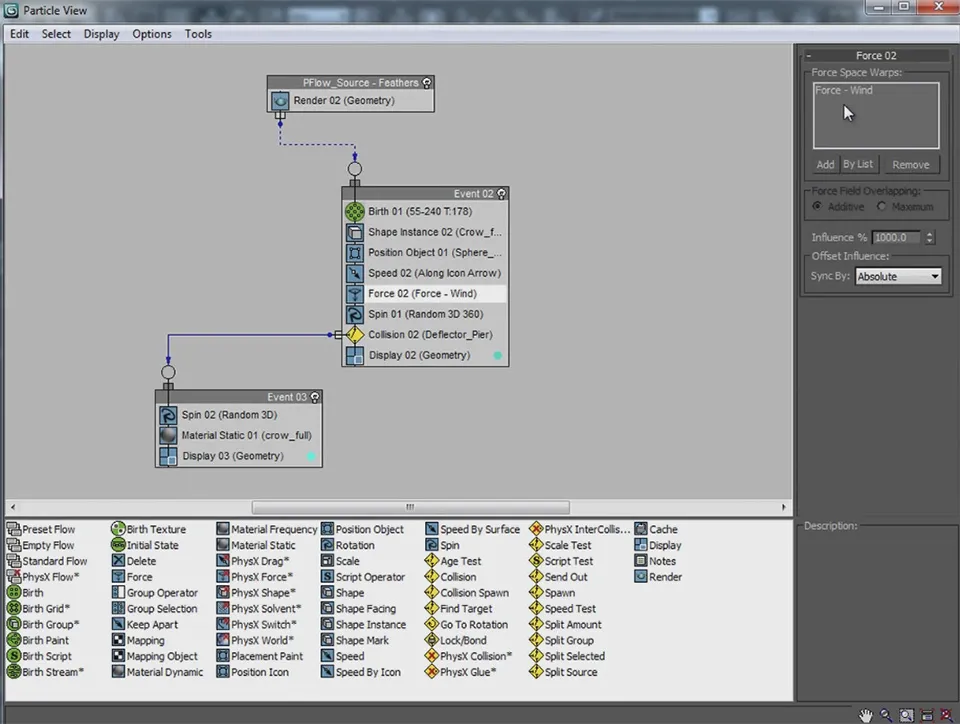
Once you are done tweaking your 3D scene and you are happy with it, it’s time to render out the completed crows.
Rendering the Animated Crows
Open up your render settings and make sure you set the correct output range to include the entire animation. Ensure that your output resolution is high enough for compositing in After Effects and that the camera is selected as the viewport to render.
Before we hit that render button, I recommend setting up a z-depth pass to be rendered out alongside your beauty pass. You can do this in the ‘Render Elements’ tab in the render settings in 3dsMax.
Add a z-depth pass (in my case that is the VRayZDepth element) and configure the z depth min and z depth max properties to represent the minimum and maximum distance from any object to your camera.
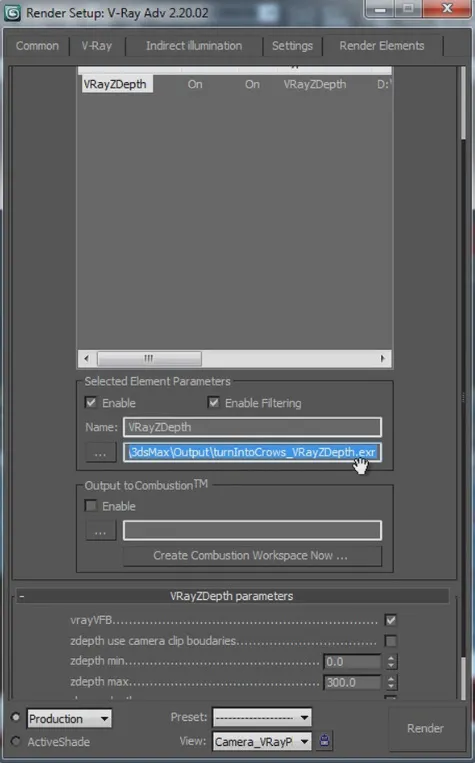
Finally, ensure you select production quality for your output and then hit the render button!
Once rendering is complete - which took overnight on my computer - you should end up with an image sequence showing nothing but your crows and their shadows being cast on the geometry you set up.
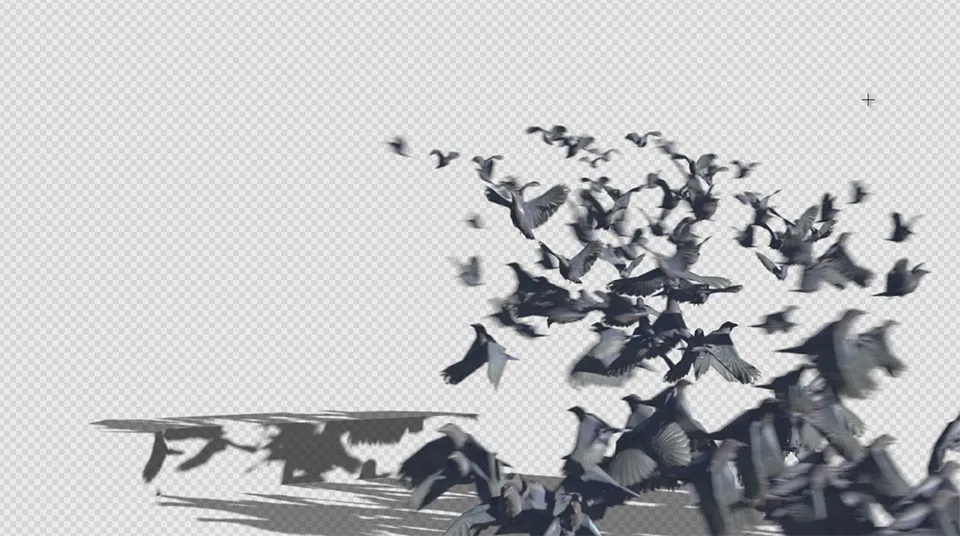
This concludes the first part of the dissolve into crows VFX tutorial. In the next part we will take this animation and composite it on top of our footage in Adobe After Effects to complete this awesome visual effect!
4 Comments
Compelling tutorial. I have attempted to emulate the animated mask; however the silhouette remains solid white in the parent composition. There appears to be a key step that eludes the completion of the true render for the pFlow. Any postulation... best, Campbell
I'm not sure what you mean. Are you having troubles animating the mask for the birth texture in After Effects?
hi, i like you tutorials very much :)
i don't know how to work with 3dsmax
can u please tell me how to Do 3D integrations using C4D :)
I am doing this tutorial and it's amazing...however, my crows are not spreading outward from the birth texture....they all are remaining within the plane....Can you help me figure out what I'm doing wrong? Thanks so much!