 Surfaced Studio
How To Give Your Video A Cinematic Look – Colour Correction
Colour Correction & Colour Grading
Almost all video footage that you will find in cinemas, on TV or online has been processed to some extent. There are two main steps involved in making dull and boring footage look epic and cinematic: colour correction and colour grading.
Colour correction is the process of correcting any problems with your footage relating to its colour. You want to make sure your clip is properly exposed and that the white balance is spot on so the colours are as authentic as possible.
Colour grading is the process of creatively applying colour adjustments, filters and stylistic effects to your footage to achieve the final desired look. There are very few hard rules in this area, it is all about finding the look that works best for your project.

It is very important to correct the colour of your footage first before you move on to colour grading. Otherwise it’s like putting on a fresh coat of paint without a proper undercoat. Therefore we will look at colour correction in this tutorial and I will discuss colour grading in a later one.
While I will use Adobe After Effects & Adobe Premiere Pro for this tutorial, you should be able to follow along with any other video editing or visual effects compositing software that you have available - as long as it allows you to alter the colour of your footage. Now let’s get started!
Fixing the Exposure of your Footage
Here is a screen from the original footage for the Super Mario Bros VFX short film Mario’s Magic Mushroom that I released a little while ago. Notice that the footage seems way too dark, especially around Mario’s face, and that the white balance is a little bit off.
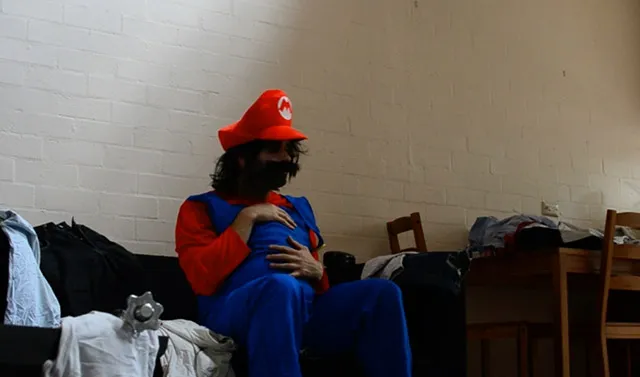
The first thing I like to do when correcting colour is to fix up the exposure of the clip. We want to make sure that the brightness of the pixels is distributed properly from dark to bright to give a pleasing image. One little trick I learned from FilmRiot is to desaturate the footage first to make it easier to see the bright and dark areas and whether something is fully black or white.
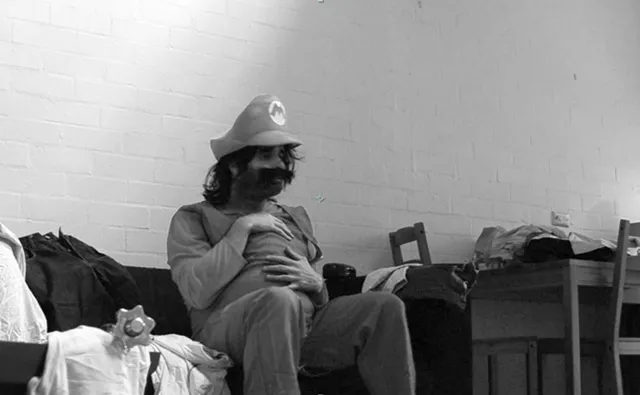
To achieve this, you can simply apply the Hue/Saturation effect in Adobe After Effects to your footage and reduce the Master Saturation property to -100.
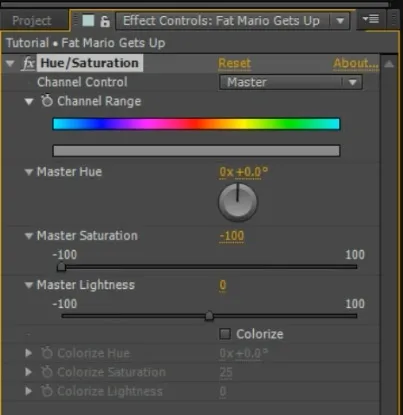
This will desaturate your footage and you can clearly see how well the clip is exposed.
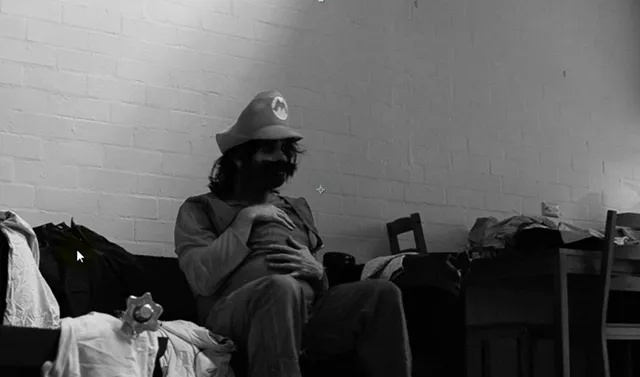
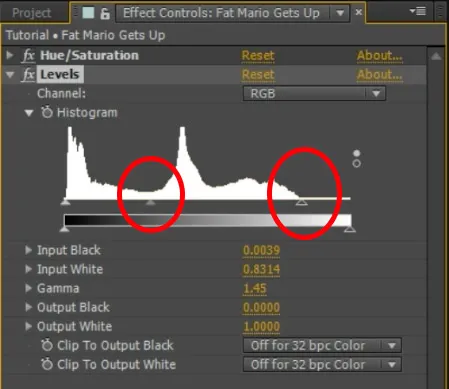
In order to change the exposure you have a couple of options and it will depend on which video software you are working with. In Adobe After Effects, my first stop is the Levels effect. Apply the effect to your clip and open up the effect settings. You will see a histogram showing the distribution of dark (left), mid (middle) and bright (right) pixels in your image.
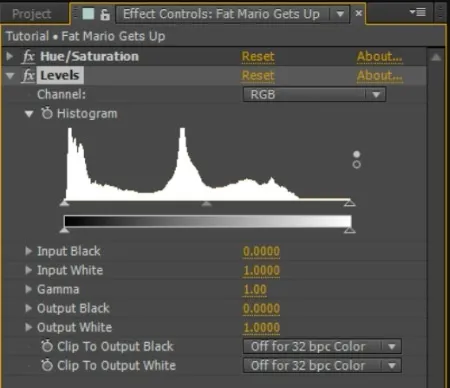
You can see 2 big spikes in the histogram, one at the dark end and one in the mid-tones. If you look at the footage you can clearly see why: the lower half of the footage is very dark, especially the shape of the couch is barely visible. This causes the spike on the left side of the histogram. The wall behind Mario is a rather flat grey which causes a spike in the middle of the histogram as the footage contains a lot of mid-tones.
Notice that the right side of the histogram is entirely empty, indicating that there are no bright pixels in the image. The brightest pixels lie at around 75% brightness - our footage is definitely underexposed.
To stretch out the brightness distribution of the footage, drag the little triangle on the right side of the histogram inwards until it sits just below where the right side of the histogram curve ends. This will push the overall exposure of the footage up and the range of brightness for the pixels will now reach from solid black to solid white. I also decided to push the middle triangle further towards the left. This will brighten the mid-tones of the footage.
The footage is now much better exposed and we can see all the elements that had previously been hidden in shadow.
Just as a note, if we wanted to darken the dark pixels (which we are not going to do here because the footage is already dark enough), you can drag the little triangle on the left side of the histogram towards the right. I would do this if there was a gap on the left side of the histogram which would indicate an overexposed image.
Remember to not overdo the levels adjustment, otherwise you might accidentally clip the brightness of the pixels and cause some of them to either go solid white or solid black. We want a nice, even exposure spanning the entire spectrum.
How you need to adjust your brightness depends a lot on the footage you are working with so feel free to experiment. After the levels adjustments, our original footage is now properly exposed.
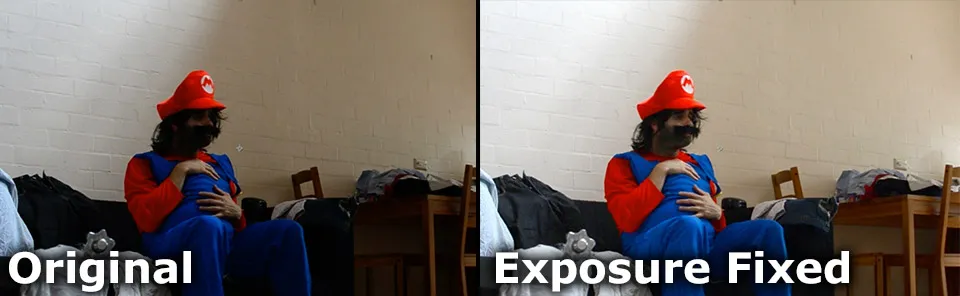
Brightness wise we are good, but brightening up the mid-tones has sucked quite a bit of contrast out of our image. This can make the clip seem rather flat and dull so let’s fix that up!
Fixing the Contrast of your Footage
If you have to do a lot of fixing on the exposure of your footage, you may end up with a clip that looks rather flat. To add some contrast back into the image i like to use the Curves effect in Adobe After Effects. Simply apply the effect to your clip and go to the effect settings.
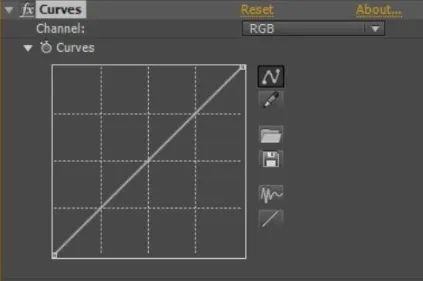
You will see a little drop down button on the top right that allows you to determine if you want to modify the RGB (luminance) channel or the Red, Green, Blue or Alpha channel individually. Leave this option on RGB for now.
The curves effect will - no surprise - display a curve representing the input and output intensity of the pixels in your image.
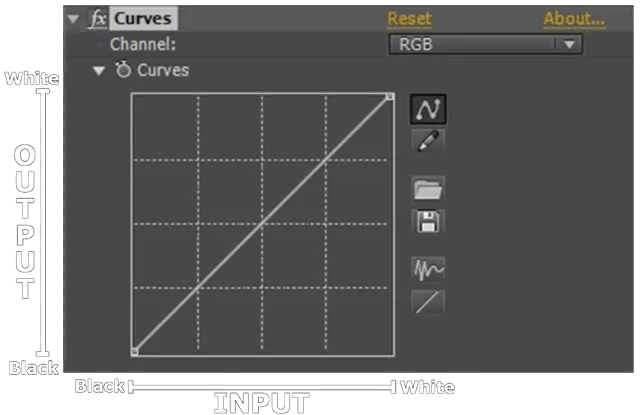
The horizontal axis represents the input brightness of the pixels in your footage with left being black and right being white. The vertical axis represents the output brightness of the pixels with bottom being black and top being white. The curve is a diagonal line because by default the pixels are output at the exact brightness they come in.
You can change the curve by adding points to it and dragging them around. Simply click on the curve to add a point. To remove a point, drag the point out of the graph area and let go of the mouse button.
To add contrast to the curve, add one point right in the middle to anchor it. Then add another point on the right side of the curve and push it up a little bit. This will brighten up the highlights in your footage. Add one more point on the left side of the curve and push it down a little. This will darken the shadows some more.
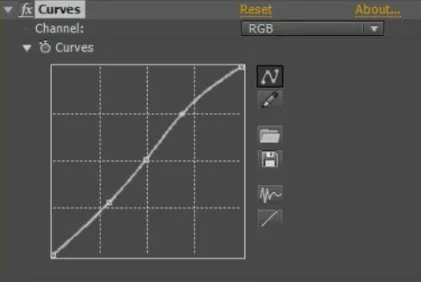
Notice how the contrast has been enhanced by the Curves effect we applied!
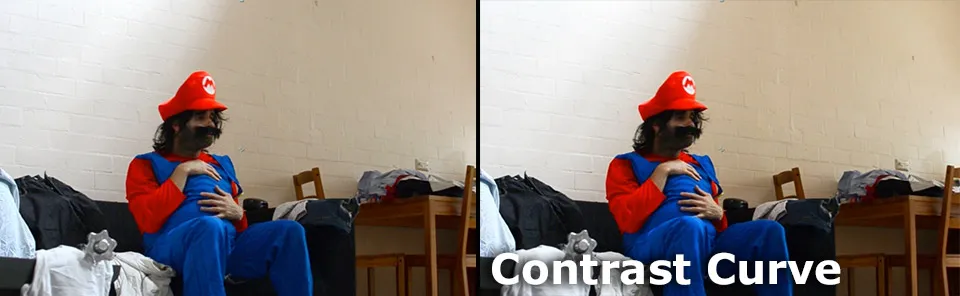
And with that, we are done correcting the exposure of our footage. Let’s move on to correcting the white balance!
Fixing the White Balance of your Footage
It is important to ensure that your white balance is properly set up when shooting your footage or your clips might come out rather discoloured. If that happens, we have to correct the white balance in post production.
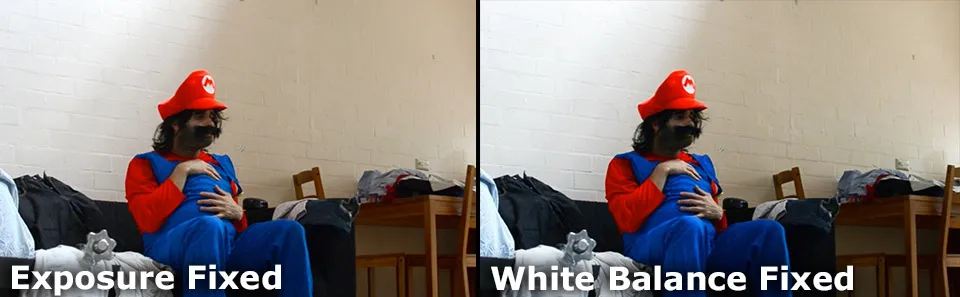
For the Mario footage, I felt the clip had turned out a little bit too yellow and decided to fix that up. Note the slight yellow tint on the wall behind Mario.
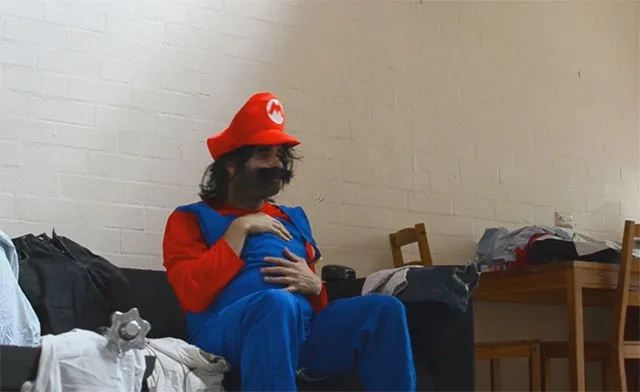
To fix the white balance, go back to the Curves effect. This time, rather than working with the RGB channel, chose the Red channel from the drop down menu. The Curves effect will show the graphical representation of only the red channel of your footage.
Reduce the red colour in the midtones of your footage by adding a single point to the middle of the curve and pulling it down slightly. This will drain some of the red from the clip and will likely add a slight cyan tint to it.
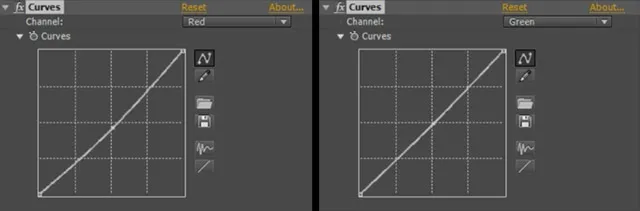
To counter the cyan tint, go over to the Green channel for the Curves effect. Add a point in the middle of the curve and bring the green up until it balances out the footage again. You generally want to avoid overly dramatic changes with the Curves effect and make small, deliberate adjustments.
With the green channel pushed up, our footage looks properly white balanced and the yellow tint is gone!
Let me quickly run you through how you can do Colour Correction in Adobe Premiere Pro.
Colour Correction in Adobe Premiere Pro
As mentioned earlier, it does not really matter which tool you use for Colour Correction or Colour Grading, as long as your software gives you sufficient control over the colour and style of your footage.
In Adobe Premiere Pro, you will also find a Levels effect. While it fundamentally works the same way as the effect in After Effects, it does not include an image histogram. This makes the effect a little less easy to use and I tend to avoid it for that reason.
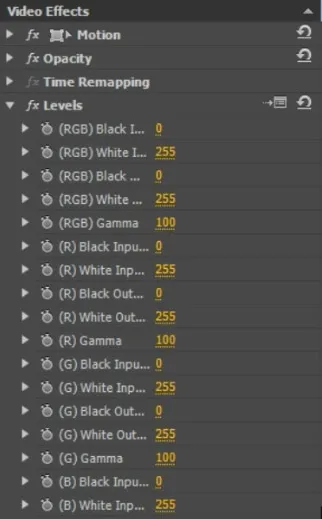
Instead, my favourite effect in Adobe Premiere Pro for doing Colour Correction or Colour Grading is the Fast Color Corrector. This effect gives you control over the colour balance of your footage and it does include the Levels effect - still without histogram, but at least with simple to use sliders. The Fast Colour Corrector also includes a White Balance picker that comes in very handy when correcting the white balance of your footage.
Here I one of the original clips from our Zombie Hunter VFX short film we did a while ago for Halloween.
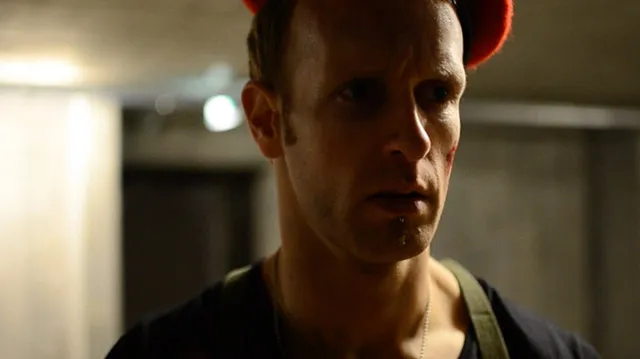
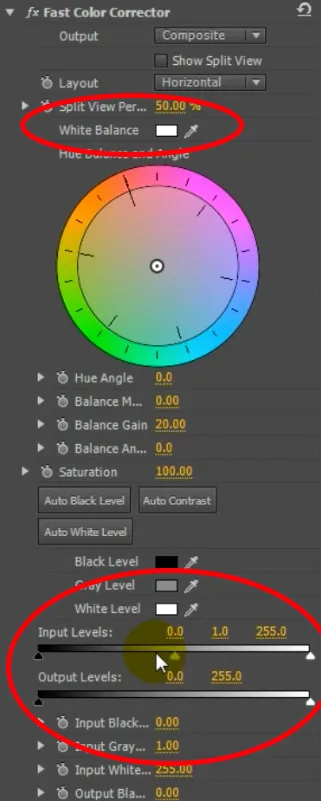
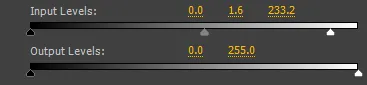
To colour correct the footage, let’s first make sure that the clip is properly exposed. For this, we can use the Levels controls inside the Fast Color Corrector effect to tweak the shadows, mid-tones and highlights as required to get a much more pleasing looking image. I decided to brighten up the highlights as well as the mid-tones of my footage.
Notice how much more detail we can see in our footage just by adjusting the levels and getting our clip properly exposed.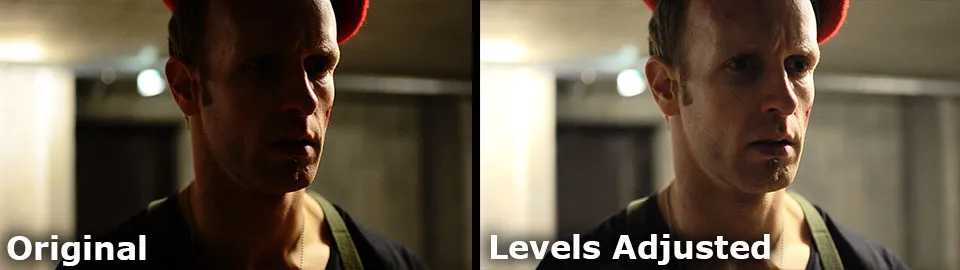
Finally, because the clip is quite a bit too yellow, we need to also correct the white balance of this clip. The Fast Color Corrector in Premier Pro includes a white balance picker that you can use to tell Premiere what in your clip should be white. Simply click on the picker and then select an item in your footage that represents white.
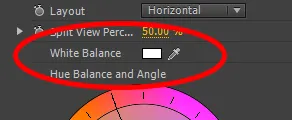
You can further tweak the colour of the footage using the colour wheel in the Fast Colour Corrector by dragging the pin in the middle around. The direction from the centre defines the colour tint and the distance from the centre controls the intensity of the tint.
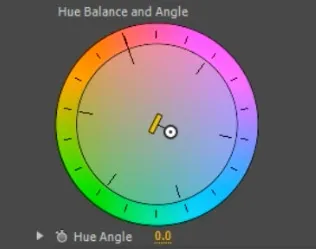
This will remove the yellow tint from the footage, but makes the image look rather flat.
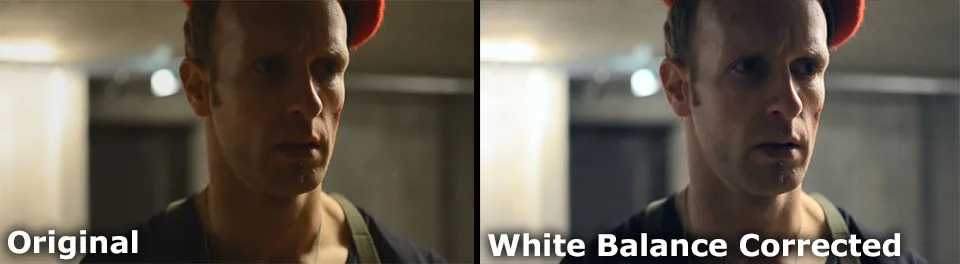
Therefore, as I do with most of my clips, I want to add a little bit of contrast back into my footage. Adobe Premiere Pro also includes a Curves effect, called ‘RGB Curves’. Add the effect to the clip and then go over to the effect parameters.
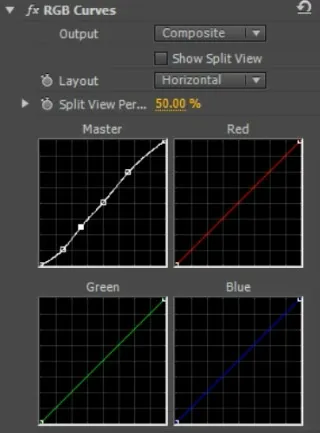
Unlike the Curves effect in After Effects, the one in Premiere Pro displays the curves for all channels separately. Other than that, it works exactly the same way. To increase the contrast push up the right end and lower the left end of the RGB curve on the top left. This will add contrast back into our footage and we will end up with a nicely colour corrected image.

Colour Correcting Consecutive Clips
It is important to ensure that all clips in a scene match in terms of colour so you may have to brighten, darken or tint some of them to make them sit seamlessly in the sequence. It is simply another thing to do with colour correction and you can use the exact same techniques described above for that.
Colour correction is a powerful tool and it will not only make your footage look much better, it will also put you in the best position to add a cinematic look to your clips when we move on to colour grading in the next tutorial.
8 Comments
which software do you use for editing these videos. i don't know the software name..
I edit all my videos in Premiere Pro
You are awesome!
Hello, thanks so much for your tutorial, my videos look so good and neat because of you!, Now I will check out regularly your website
I havent even completely read your post or tried this but just scrolling through I already know you have given us a good coaching. Id be stuck on your blog now as I learn along. thank you so much
Haha, thanks for the feedback :) Glad to hear you're finding my content useful!
How can I remove the background from video
There are different techniques that you can use depending on what your footage looks like. Check out my tutorials on green screening (the recommended approach) or, if you didn't film with a green screen you can use rotoscoping. Again I have a few tutorials for that that on my YouTube channel and this website :)