Rhino Camera Slider Review
A little while ago I received my Rhino Camera Slider, months after backing their kickstarter project!
I decided to make a full review video for the slider because I felt it was easiest to show you all of its features and take it for a test run in Melbourne to see whether it was worth the money :)
Rhino DSLR Camera Slider Video Review
Features
There are 3 different versions of the Rhino camera slider available:
| Model | Price | Weight |
|---|---|---|
| Rhino Slider | $400 | ~5lbs (2.5kg) |
| Rhino Slider Carbon | $475 | ~3lbs (1.5kg) |
| Rhino Slider Pro | $550 | ~10lbs (5kg) |
All models come with 48” rails for your camera to slide on, made from stainless steel except for the Carbon fibre variant which, as the name suggests, uses ultra light carbon fibre rails.
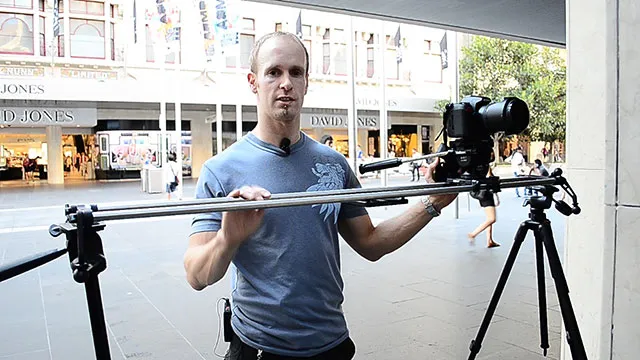
Here is my setup of the Rhino slider. I have mounted a Velbon PH-368 camera pan head which I bought for around $50 off ebay onto the carriage. The pan head gives me full control over the movement of the camera on the slider.

All parts of the slider are made from hard anodised Aluminum and have been well designed. The carriage itself has 6 rollers containing 12 ball bearings to provide a nice and smooth experience.


The carriage is equipped with two friction brakes, one on each side, that are easy to tighten and will prevent the carriage from moving around. I found these extremely useful as I moved the slider around a lot with the camera on it and I didn’t want the whole thing to go flying about.

Also on the side of the carriage are two tension wheels that you can adjust to increase or lower the friction on the carriage of the camera slider. This is useful to ensure you have the right amount of resistance for whatever camera you have mounted on top of the carriage.

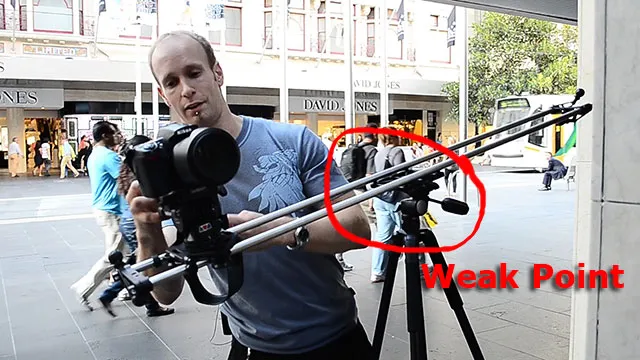
The main reason I decided to go with the Pro version of the camera slider is that it includes a centre mount for placing the slider on a single tripod. The centre mount is very sturdy and firmly attached to the underside of the slider.

The centre mount also has an inbuilt water scale which is great for setting up the slider and ensuring it’s horizontal.

The Carrying Case
I paid $575 as a Kickstarter backer and received the Pro slider as well as a carrying case and a pulley system. The carrying case by itself costs $75 and the pulley system is priced at $50.
The carrying case is made from extremely tough material, has compartments for multiple sets of rails, a back strap and an internal handle for moving the carrying case around during your shoot.

The ends of the rails for the slider can be folded away and tuck in under these little flaps. This straps your Rhino slider nicely into the bag and makes sure nothing is moving around.

To further lock the rails in place within the carrying case, small Velcro straps are sewn on the inside and wrap around the rails.

I think the internal handle is a pretty cool idea. Without packing everything up, you can just grab your opened bag and move to a different location.

The Pulley System
One of the available accessories is a pulley system that attaches to the side of your Rhino camera slider and provides a means to easily move the carriage for vertical or slanted shots. In the bag, which doubles as a handle for the pulley cable, is the pulley cable which ends in a screw that connects to the carriage, a pulley wheel and a screw to connect the pulley wheel to the side of the slider.

The screw at the end of the pulley cable connects straight into the side of your carriage. The carriage has a thread for the pulley cable on either side.

Connected to the pulley wheel is a small arm, the pulley lead, which feeds the pulley line cleanly onto the wheel.

I was extremely excited when the Rhino camera slider arrived and so I decided to take the slider out with me to Melbourne to see how it would perform in the field :)
Rhino Camera Slider Field Test
One thing I noticed immediately when I was walking through Melbourne to meet Jimmy for shooting in Union Lane was that the Pro version of the camera slider is very heavy. 10lbs (5kg) may not sound like that much, but if you have to carry the camera slider with you for a longer period of time, you are likely going to feel it in your arms.
The weight really became an issue when I tried to set up the slider on my tripod using the center mount. Due to the length of the slider and the fairly even weight distribution, even Jimmy’s fairly sturdy Manfrotto tripod could not hold the slider horizontal when we started to move the camera from side to side.
In order to use a single tripod you’d likely need something like a Manfrotto 028 Triman - basically a set of professional tripod legs, but that can cost you an arm and a leg. As an alternative (if you value your limbs) is that you can mount all models of the Rhino slider on two tripods, one on each side. Weswitched our configuration over and ended up with a very sturdy setup using 2 tripods to hold the camera slider horizontal. With this setup, there was no issue at all with the stability of the camera slider.
We proceeded to shoot some amazing shots of the street art in Union Lane. I then took the slider off the tripod to get some low angle shots and try out the stability of the legs.
I soon noticed that that the hole for one of the legs was not properly drilled through and I could not properly tighten the screw on one of the legs. This made this test a little bit tricky, but I think the weight of the camera slider was actually beneficial in this situation. Due to the heavy weight of the Pro version, the slider was nice and solid on the ground and did not wobble, shake or jitter during my shots, even with one leg not fully tightened.

Finally, I decided to try out the pulley system and connected everything up to get a few almost vertical shots. mounted my slider with only one side on a tripod and the other side on the ground, connected up the pulley system and tried to get a few vertical shots. I like the idea of using the pulley bag as the handle for the cable, but it did feel a little awkward at times. I think I would prefer a smaller dedicated handle just on the end of the cable. However, the idea with the bag is that you can put counterweight into it to make the movement of the pulley smoother.
The pulley system worked surprisingly well even though I failed to add any counterweight into the bag.
I did notice though that when I tried to add counterweights at home, the pulley did not work as well as expected.
The pulley guide has an opening at the bottom for the cable to snap through. This however means that you cannot pull the cable in any downwards direction as it will simply slip back out of the opening. This can, depending on how you set the slider up, make it tricky to use the counterweight properly as too much counterweight will simply cause the pulley cable to slip back out of the lead.

Other than this rather strange oversight, the pulley was super easy to install (takes about 1-2 minutes to set up) and worked very well.
Verdict
I have to say I am very, very impressed with the quality of the shots we got with the Rhino Camera Slider! The movement is silky smooth and the final shots look very professional. All the parts are very well designed and nothing about the slider feels cheap in any way.
I was a little surprised that the threads for the screws on one leg and for the pulley system on one side of the carriage weren’t drilled through properly. Given that I was one of the last ones to have their Rhino slider shipped and they discovered this issue fairly early in the delivery phase, I would have expected them to have this resolved by the time they got to send my order.
Also, it’d be great if the pulley lead could be closed so that you could add enough counterweight and let it fall vertically to pull up your camera without risking the pulley cable slipping out of the lead.
In terms of the different versions I would recommend going with the carbon fibre model. Unless you can afford a very professional set of tripod legs you will likely not make any use of the centre mount and the extra weight of the Pro version of the camera slider will get in the way more than it will help.
The Rhino camera slider might not be the cheapest option out there, but you do get quality for your money and if you want beautiful slider shots for your video projects, it is definitely an option worth considering.