In the first part of VFX Vlog 5 I talk about the bad habit of ‘fix it in post’ and give you a few tips on how to effectively manage your files and folders to improve your workflow.
The problem with ‘Fix It In Post’
Have you ever been out on a shoot and heard someone say something along the lines of “Don’t worry, we’ll just fix it in post”?
The expression ‘fix it in post’ refers to fixing an issue with the captured footage in post production rather than dealing with the issue on set. For example the lighting might not be ideal or there are elements in the scene that you didn’t intend (e.g. someone walked through your shot) or you forgot to bring your green screen but filmed the footage anyways.
Most of the time, ‘fix it in post’ should make all your alarm bells ring because it usually is not a well considered choice but rather just a sign of laziness. It might feel convenient at the time, but it will likely end up costing you much time and effort than you’re saving.
Modifying video footage in post production using tools such as Adobe Premiere, After Effects, Final Cut or Motion tend to take a very long time. Film footage is captured at 24fps and if you need to trim someone out of a 5 second clip manually in post production, that is 5 x 24 = 120 frames that need to be fixed. If 1 frame takes you 30 seconds to fix, then the whole operation is going to cost you 1h of post production work. How long would it have taken you to reshoot the 5 second clip? Probably less than 10 minutes!
There are countless examples of this happening as it’s a tempting thing to say “we’ll fix it in post”, but whenever you hear someone utter these words, be alert! Consider whether you are much better of spending a few minutes setting up an extra light, going to get your green screen or reshooting the clip to ensure you save on post production time – most of the time, it will be worth it!
VFX Workflow – Organising Files
Whenever you work on larger film projects, whether they include VFX or not, you are likely going to end up with a large number of files. Images from the set and of props, your base footage, b-roll and more will fill your hard drive and once you start editing, adding VFX and colour correcting you will end up with even more files.
Staying organised is one of the most important parts of your workflow and to me, the way I organise my files is very structured and makes it easy for me to always find what I am looking for quickly and easily.
Of course the file and folder structure you choose needs to fit your workflow and the type of project you work on. Other considerations might be how many people you have working with those files, how they will be shared, named, processed, etc.
Here is a screenshot of what my typical folder structure looks like for my VFX tutorials:
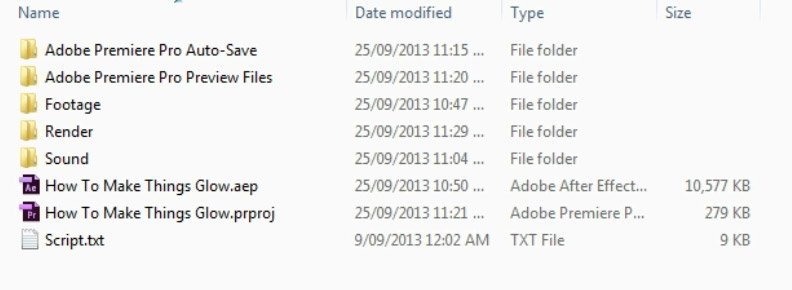
My Footage folder contains the raw footage I took on set. This includes both video and images (which are in a subfolder called ‘Images’) and so I know where to look for the original video files we recorded for the project.
My Render folder contains any files that have been exported either from Premiere or After Effects. Any clips that have been processed to add VFX, colour correct or tweaked will end up in the Render folder. This folder will also contain the final video export from Premiere.
Since I do quite a bit of work on the audio for my tutorials and short films using Steinberg Cubase I have a separate Sound folder that will contain the Cubase project file as well as any sound effects, music tracks and other audio material that I need to complete the project.
The base project folder for my project then just contains the Adobe Premiere and Adobe After Effects files as well as a simple text script file.
As I mentioned, how you organise your files and folders on your hard drive will depend on how you work and what you require for your particular project, but you should try your best to remain well organised – it will greatly improve your overall workflow!
VFX Vlog #5 Part 2 – Adobe After Effects Rotobrush Tutorial
In the second part of the VFX Vlog I will show you how to use the Rotobrush tool in Adobe After Effects so make sure you go and check that out!


2 Responses
i was editing a video where there was a green screen and someone clipped out of the green screen but rotoscopping is not working for some reason
If you’re clipping out of your green screen then rotoscoping will be your only option unfortunately. How was it ‘not working’?