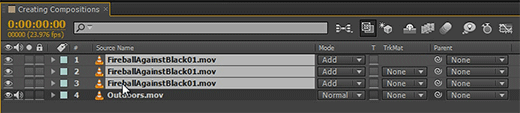
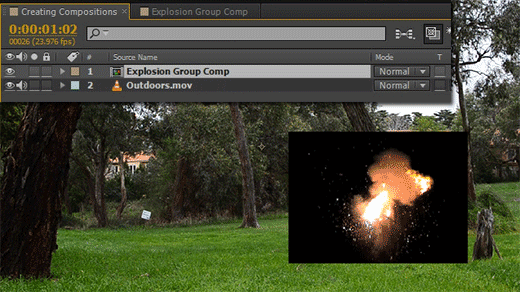
Grouping Layers and Pre-Composing
Select all 3 explosion layers.
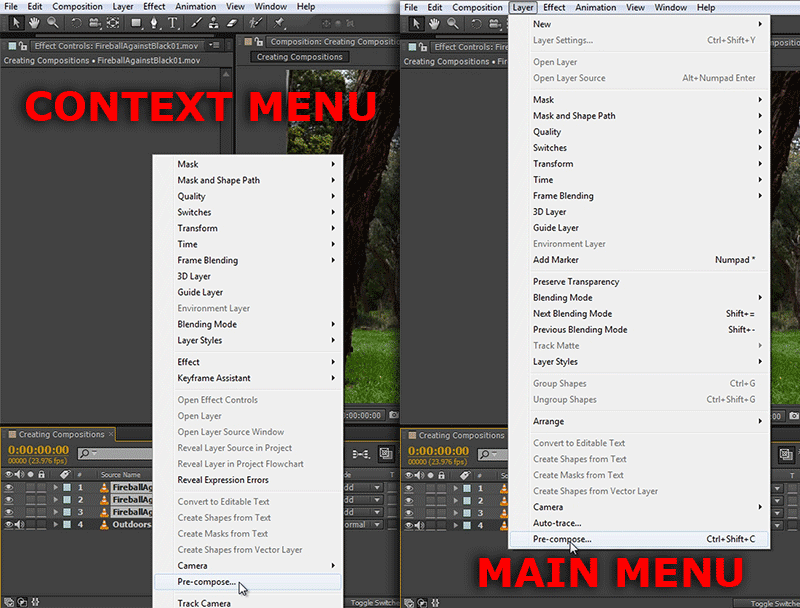
We are going to nest these layers into another composition by pre-composing them. Again you have two options! You can either right click and select ‘Pre-Compose’ from the context menu or go to the main menu and select Layer-> Pre-compose…
I am going to call this new composition ‘Explosion Group Comp’.
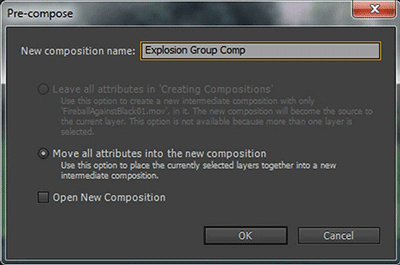
Note that we are given two options.
- Leave all attributes in ‘Creating Compositions’. Choosing this option will leave any effects and transformations we applied to the layer we are pre-composing in the current composition and only nest the layer itself. This option is not available if you are pre-composing more than a single layer.
- Move all attributes into the new composition. Choosing this option will move all selected layers, any effects and transformations on them into the new composition. Since we have 3 layers selected, this is the only option available to that, but that’s cool. Just click OK.
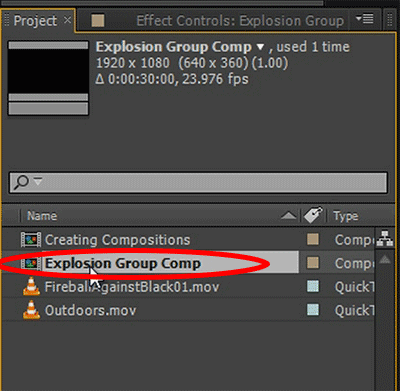
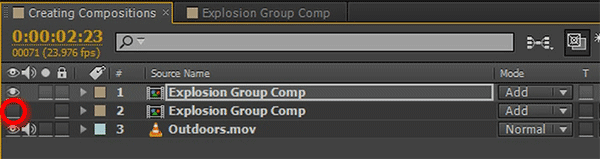
Note that our 3 explosion layers have been replaced by a single layer called ‘Explosion Group Comp’.

This is our newly created composition and it contains our 3 explosion layers. If you go to the Project Window you will also see the newly created ‘Explosion Group Comp’ composition in there.
You can open the composition by double clicking on it, either in the project window or in the timeline. You will see the 3 explosion layers we pre-composed inside of it. Note that they are still at the same positions and timing as when we originally set them up.

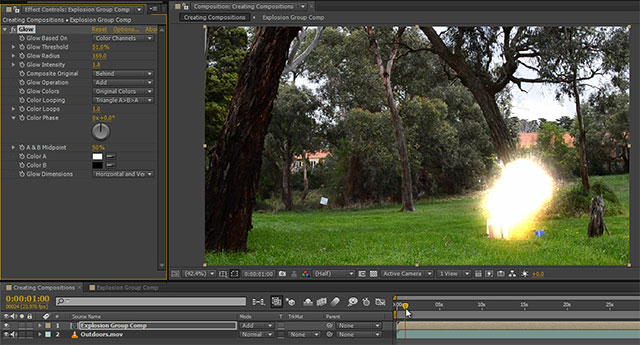
If we now return to our original composition and scrub through the effect, we will see our 3 explosions appear like before. However, they have regained their ugly black boxes! This happened because the new composition we created is set to Normal blend mode.
We can fix this by setting the blend mode back to Add.
Now this might look exactly like it did with our 3 separate explosion layers, but this setup allows us to assign the Glow effect to the explosion Group Comp layer and it will apply to all of our explosions. Again, increase the Glow Radius and Glow Intensity and lower the Glow Threshold so you can see the effect clearly.
We have used the composition to group together our explosions and we can now treat them like a single layer.
Besides pre-composing to nest compositions, you can also drag one composition into another, given that you are not creating a circular reference.
Go back to the project window and drag another copy of the Explosion Group Comp into your composition. This will add another 3 explosions into your scene!
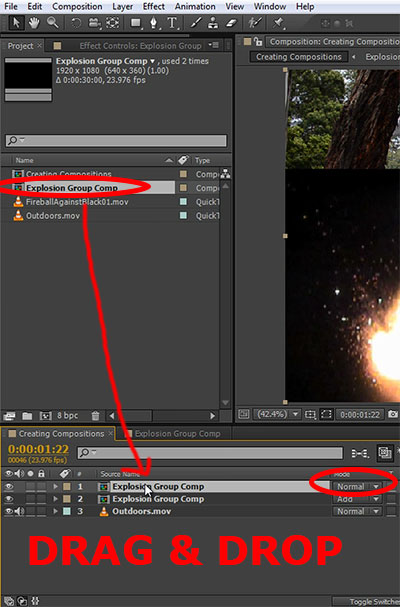
Set the blend mode for this new layer to Add to get rid of the black boxes again. I am also going to flip this layer horizontally so the explosions don’t line up exactly.
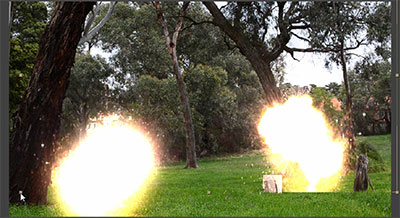
Offset this second explosions group by a little bit so we end up with 6 consecutive explosions all happening at different times and in different spots in the scene.

Scrub through your footage and a barrage of explosions should appear! Note that if we disable the visibility a single Explosion Group Comp layer, we hide all elements inside of it. By hiding a single pre-composed layer, we are hiding all 3 explosion layers inside of it.
Have you noticed that only the explosions from our first Explosion Group Comp have the glow effect applied to it? Again if we wanted the Glow effect to be applied to all 6 explosions we will have to copy it across from the first layer onto the second one.
But again that would not be a smart thing to do. Instead, we can pre-compose our layers. Note that we can pre-compose any type of layer, whether it is footage, text, solids, shapes or other compositions.
Before we do this though, first delete the Glow effect from the Explosion Group Comp layer.
Now select both Explosion Group Comp layers and go to Layer -> PreCompose.
I am going to call this new composition ‘6 Explosions’ and hit ‘OK’.
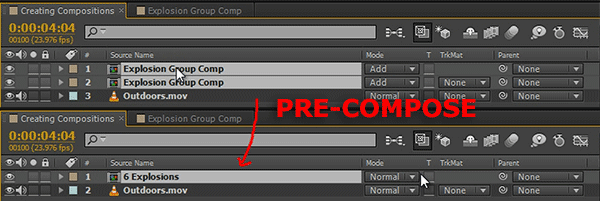
Set the blend mode back to Add on the new composition. This layer now contains two Explosion Group Comp layers which contain 3 explosion layers each.
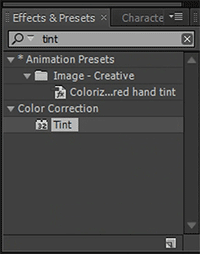
Since I’m getting bored of the Glow, let’s instead add a Tint effect to the 6 Explosions layer. You can find the Tint effect in your Effects & Presets browser.
Change the Map White To property to a funky colour like blue.
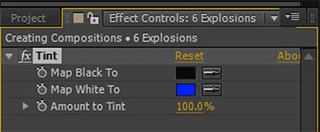
All 6 explosions in your scene are now… um… strange blue puffs! They look like ghost explosions :D

Not particularly pretty, but I just wanted to show you that you are free to pre-compose any elements that you want.
Creating Reusable Elements with Compositions
Finally, let me show you what I consider to be the true power of compositions – creating reusable elements.
If we dig into our Explosion Group Comp (by double-clicking on it) we can see our 3 fireball stock footage elements layers just like we added them into our original composition. Note that each of these elements is essentially the same, they’re just scaled, positioned and timed differently.

With this set up, if we wanted to change the look and feel of the individual explosions we would have to apply effects to each layer separately and that’s not a good way to manage complex effects.
Instead, we should create a composition that contains nothing but our basic building block – a single stock footage explosion element. We can then reuse that composition everywhere where we currently use the raw explosion footage.
What this allows us to do is to change the look of all explosions because we can tweak how it looks inside that very basic composition.
If that sounds confusing, it really isn’t.
Let me show you what I mean!
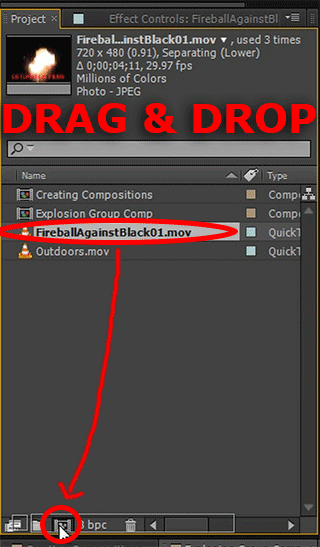
For this, go to your project window and select the explosion stock footage element. Drag this element onto the ‘Create a new Composition’ button at the bottom of the project window.
This will skip the configure settings dialog box and create a new composition with the same name, dimensions, frame rate and duration as the footage you dropped onto the icon.
As we did with the explosion we added at the beginning of this tutorial, trim out the first few frames of the stock footage to remove the logo.
Now return to the Explosion Group Comp.
We now want to replace all layers that use the raw stock footage explosion with our newly created composition.
There is an easy way to replace a layer: first, make sure the layer is selected. Then select the layer you want to use as replacement – in this case our FireballAgainstBlack01 composition – in your project window. Now, holding down the ALT key on your keyboard, drag this composition onto the layer you want to replace!
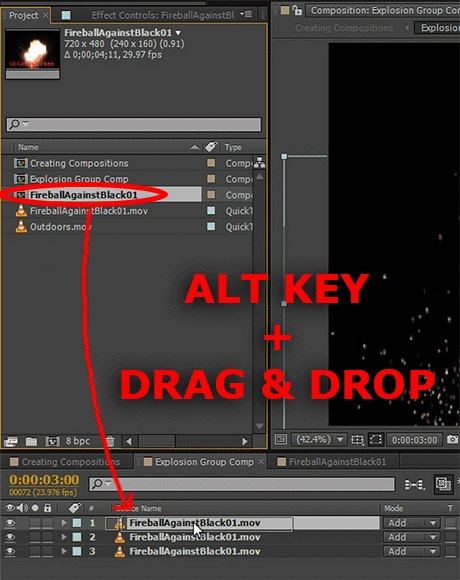
Voila! The layer has been replaced, maintaining the timing, transform and all effects that were applied to it.

Select the next stock footage explosion layer and repeat the process: drag the new FireballAgainstBlack01 composition onto the layer while holding down the ALT key. Repeat once more to replace the last layer.
All your explosion layers should now be instances of the FireballAgainstBlack01 composition which contains the explosion stock footage.

If you scrub through the Explosion Group Comp, it should look exactly like it did before with 3 consecutive explosions in different parts of your scene.
Now for why this is a much better setup than what we had initially!
Double-click on the FireballAgainstBlack01 composition to open it up.

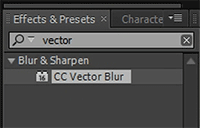
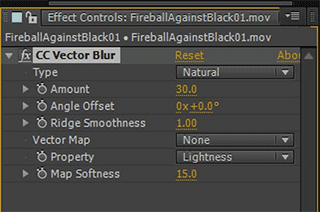
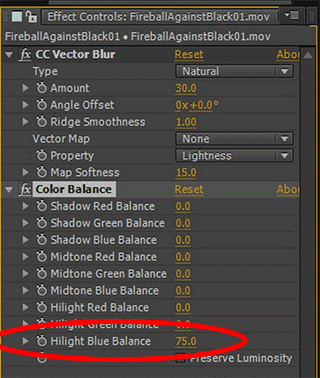
Go to a time where you can clearly see the explosion and go over to the Effects & Presets panel. Search for the CC Vector Blur effect and apply it to the explosion stock footage layer.
Increase the Amount to around 30. Feel free to play with some of the other parameters to change your explosion effect until you’re happy!
This will distort your explosion in a very sinewy way and make it look almost like an energy ball. Pretty funky :D

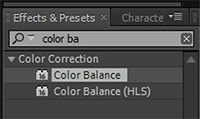
Let’s further shift it away from a natural explosion by colouring it slightly blue. For this, search for the Color Balance effect and apply it to the layer.
Increase the Highlight Blue Balance to around 60 to give the energy explosion a nice blue-ish tint in the bright colours.
Your explosion should now look like a blue energy ball explosion!

If you now return to the Explosion Group Comp and scrub through it you will notice that all of our explosions have changed into the energy ball explosion! If you go to our original composition and play it back you will see 6 energy explosions go off!

And all we had to do was tweak the single composition that contained our base explosion stock footage element!
If you look at our composition setup, we have the 6 Explosions composition which contains 2 copies of the Explosion Group Comp which contain 3 layers with the Explosion Comp each. Explosion Comp layer points to the same composition and therefore, changing this single composition will affect all of its copies :)
Creating reusable elements is where the true power of compositions lie and it is an essential technique for building very elaborate visual effects.


6 Responses
Hi There ( i don’t know Yr Name, Yet :P )
Maybe i’m first who comment here…
Very Great Tutorial and also Help Me…
Thanks…
Really great! Thank you!!
Hey Tobias,
I’ve been editing for a little while now and wanted to expand my Affter effects skills. Your tutorials are great! i really appreciate you taking the time to put these together and have the different experience levels to work through. Your the man, keep up the great work!
Thank you very much :) Glad you’re enjoying my tutorials!
Hi!
Thanks for all the hard work you are putting in .
Best
Thank you very much!